This post may contain affiliate links where we earn from qualifying purchases. As an amazon associate, we earn from qualifying purchases. Find out more in our disclosure.
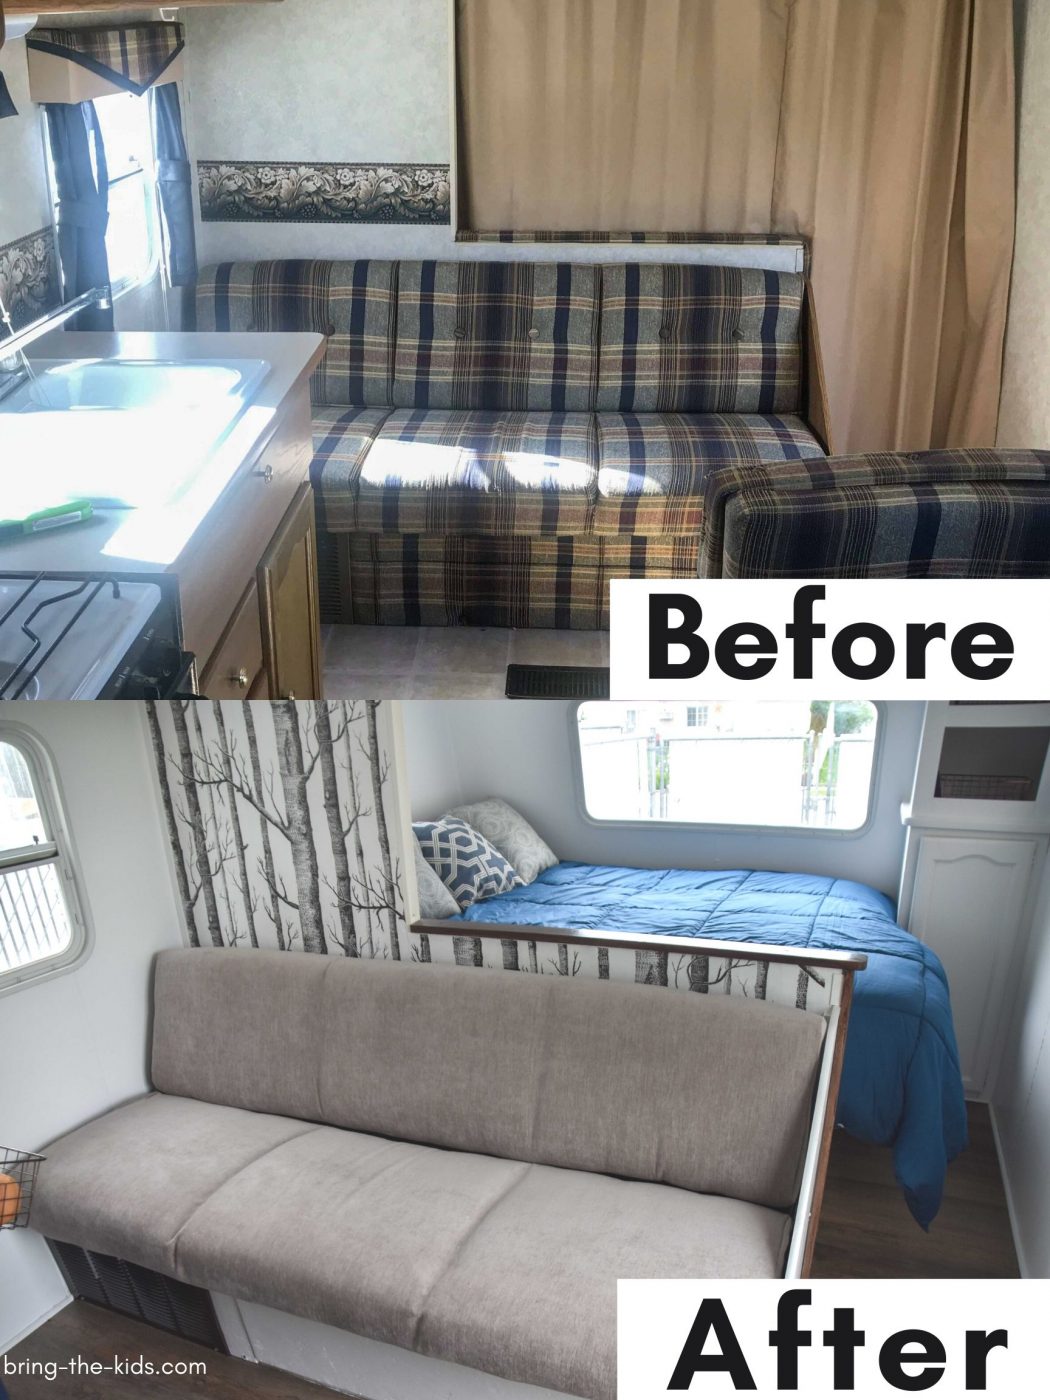
We just finished our whirlwind RV remodel on our new to us travel trailer. Yes, we really did remodel our trailer in just one week! You can read all the details of our $600 RV Remodel. It was a good chunk of work, but considering that I did it solo with just the help of my 5 little kids, I feel like almost anyone can do it.
As we were getting ready to redo our travel trailer, we knew that our RV renovation budget needed to be pretty tight, so we didn’t blow all our cash. We searched and searched and were basically blown away by all of the amazing options out there to renovate an RV for cheap (RV renovations are so much cheaper than home renovations!) Of course, if you don’t already have an RV, you’ll want to read about how we bought our RV for super cheap as well.
So we want so share with you some of the things that we did when we renovated our RV, others that we just considered doing along our journey of RV renovations.

- Come Up With A Plan (Don’t Skip This Step)
- 1. Clean it up
- 2. Install (fake) Wood Floors
- 3. Put new tile in the bathroom
- 4. Install a new backsplash
- 5. Put up new wallpaper
- 6. Get new bedding
- 7. Remove old decals from the RV exterior
- 8. Add some green
- 9. Recover or reupholster your RV furniture
- 10. New window coverings
- 11. Ditch the wallpaper border
- 12. Install new hardware
- 13. Redo your Shower and Tub
- 14. Organize your Area
- 15. Personalize Your Space
Come Up With A Plan (Don’t Skip This Step)
Before you start doing any RV updates, come up with an overall plan for what you want your updated RV to be like. Create idea of what you want things to look like, but most importantly, how you want things to FUNCTION! Having a plan in place before you get started HELPS SO MUCH! We love this RV Organization Guide from Let’s Travel Family. Their family of 6 lived in their RV for several years, so they’re PRO’S at storage an organization. Getting tips and ideas from them helped to much with our RV Renovations. If you use the code bringthekids you can get 15% off any of their guides (including their new Full Time RV Living Guide).

1. Clean it up
Time: 1-2 hours
Cost: $5-$10
Before you attempt any major renovations on your RV or travel trailer, first give it a good thorough cleaning. If your RV hasn’t been properly maintained or has been neglected for a while, it’s likely looking a bit dingy and gross. I recommend cleaning all your cabinets and kitchen area with Greased Lightning to help clean the area, but to also get rid of any grease and oil that has built up over time. We tried several different cleaners and none worked as well. We needed 2 bottles to clean all of our 26 foot trailer.

To really do a deep RV bathroom cleaning, start with Lime Away. If you haven’t used Lime Away before, this stuff is amazing. When we first bought our travel trailer, I thought I needed to replace or refinish all our sinks and our tub and shower. With less than 10 minutes of cleaning with Lime Away, I got all of those surfaces looking SO GOOD, and almost like new. You absolutely have to try it!
Also, don’t forget to clean the windows (inside and out). You’ll be amazed how much better your RV will look with clean windows and better light coming in!
2. Install (fake) Wood Floors
Time: 4-5 Hours
Cost: $60 and Up
I know most people think of installing new floors as a super hard job. Guess what? It’s really not too bad!
Most older RV’s come with either ugly vinyl linoleum or nasty carpet. Either way, you should consider replacing your RV flooring. We decided to put in new luxury vinyl tile in our trailer (aka fake wood floors), and it made the biggest difference EVER! Seriously, the change was like night and day. Putting new flooring in your RV instantly changes the whole feel and gives your RV an updated look.

While installing new flooring in an RV can get really expensive, you can save tons of money by looking for remnant boxes. We also love these vinyl planks from HomeDepot that our friends have – Such a good deal and so many beautiful colors, so you can get exactly the look you want!
We were able to get enough flooring (with about 25 square feet extra) for our entire trailer for $60 on Facebook marketplace. In fact, when I started looking, I was blown away by how many people were selling boxes of vinyl and laminate flooring that were brand new or leftovers from a bigger project. The nice thing about an RV is that your floor space is minimal, so you really don’t need much. We used about 80-85 square feet of flooring in our trailer, and ended up with lots of larger scraps where I wasn’t as careful about placement.
One thing that I love about vinyl plank flooring is that you can install it directly over your linoleum in your RV. It’s seriously SO EASY! While redoing your RV floor isn’t something that happens instantly, it’s also not too hard. I had light help from my 13-year-old and it took us about 4-5 hours to do our entire project. Make sure that you get one of these kits to make the job easier, and in less than a day, your RV will be transformed.
3. Put new tile in the bathroom
Time: Less than 1 Hour
Cost: $10
Okay, when I say put new tile in your RV bathroom, I don’t mean traditional tiles. Traditional tiles aren’t good for RV’s since they are so heavy and they require a special flexible mortar as well.

When installing tile in an RV, you should use peel and stick vinyl tiles. I cannot believe how easy this project was and it took our bathroom from BLAH to WOW instantly! Peel and stick floor tiles in your RV bathroom are super easy to install (all you need is a clean floor and a utility knife to cut them), and are also incredibly cheap (I paid about $10 for 10 tiles which was enough for all my bathroom floor AND a backsplash around our sink). You can find these tiles in lots of fun patterns as well as plain and are a great way to add some fun to your RV design. Here are some of the best designs of peel and stick tiles:


One thing that we did to help our peel and stick floor tiles to last longer is to caulk around the edges of the room, around the toilet, and in the little cracks between tiles. You see, I’ve got 4 little boys and bathrooms can get a bit sketchy if their aim is off. Our goal of caulking our peel and stick tiles is to make sure that no water (or pee) get into the cracks and loosen the adhesive. If one or two do come lose with time, I’m not worried since they’re so cheap to start with! 3 years later and we don’t have any problems with the floor tiles and none of them are coming up!
Having a contour gauge was also a lifesaver with the rounded cuts around the toilet, so I highly recommend grabbing one of those (we used ours all the time in our RV remodel).
4. Install a new backsplash
Time: Less than 1 Hour
Cost: $30 and up
Again, we’re talking peel and stick tiles for the WIN. You don’t want to put traditional tiles in your RV because with all the movement, they’ll likely break or come loose. Instead, you can get peel and stick “tile” sheets that are crazy easy to install. Peel and stick backsplash tiles work excellent in an RV because they’re both light and flexible.

When I opened up our package of peel and stick backsplash tiles, I was actually really disappointed. This looked like a sheet of puffy stickers that my kids would by with their chore money (except minus the obnoxious characters). Even though I though the backsplash tiles looked cheap and junky, I decided to still go for it (we had a tight time schedule we were trying to stick to). I am seriously so happy that we still put these tiles in. They look so good on the wall, and instantly changed our kitchen area. Here are some of hte best peel and stick backplash designs:


To install our peel and stick backsplash, all we needed was a pair a scissors (yes, just regular scissors). They cut really easy, so that made it a pretty quick job (about an hour total). To help make sure that we got the cuts perfect around our round windows, we used this contour gauge, which is a pretty amazing tool!
A few tips about using peel and stick backsplash tiles that we learned:
- Buy the larger 12×12 tiles instead of 10×10 tiles – you get a lot more coverage for your money.
- Make sure your surface behind the tiles is really smooth. Because the tile sheets are so thin, your wall imperfections will show through as bumps under the tile.
5. Put up new wallpaper
Time: Less than 1 hour
Cost: $8/roll and up
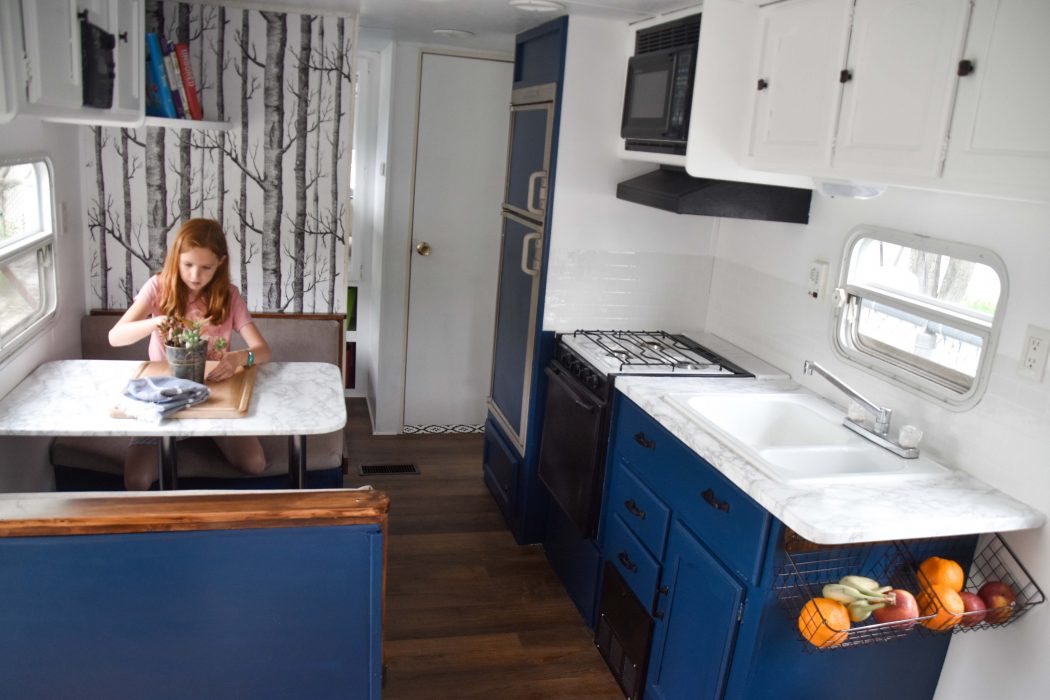
I know that most people LOATHE RV wallpaper, but hear me out on this one. There are so many amazing wallpaper designs out there right now, that can completely modernize the look of your RV. We chose ours to reflect our love of nature, but still to complement the modern theme that we were going for with our trailer.
Peel and stick wallpaper is the easiest and best way to completely transform the look of your RV!
You’re probably seeing a trend here, but we used peel and stick wallpaper in our RV. After having some serious issues getting our wallpaper border off or our trailer, I was swearing against any and all wallpaper in our RV. Well, peel and stick wallpaper in your RV is basically like putting contact paper on the walls. Love it while it’s there and pull it off when you’re ready for a new look. EASY PEASY!
One thing to keep in mind with installing peel and stick wallpaper in an RV is that it takes many hands to make sure it’s smooth and that you get your pieces lined up JUST RIGHT. You see, unlike in a traditional home where you can just move all the furniture around, in an RV, you have to work around everything. That means that while you’re installing your wallpaper, you’re squatting on your dinette, or trying to maneuver around your sofa. It’s not impossible, but having more hands will make the job less frustrating and much faster. It took us about 45 minutes to install wallpaper on 2 walls in our travel trailer, which took 3 of these rolls.
Here are some of the most beautiful peel and tick RV wallpapers that you can get to instantly update your RV.


6. Get new bedding
Time: 10 minutes
Cost: $50 and up
New bedding is one of the best ways to update just about any room, and that’s especially true in an RV or travel trailer. We got all of the bedding for our trailer for less than $100 brand new (sheets, pillowcases, comforters). It gave our trailer an updated look and took basically no effort on my part.
Tips for choosing bedding for an RV or travel trailer:
- Choose dark colors or subtle patterns to hide colors.
- Unless you plan on bleaching often, don’t buy white bedding for your RV.
- Choose a warm comforter if you will be traveling to cold places so you can use your furnace less.
- Get these amazing clips to help keep your bedding in place and neat looking.
7. Remove old decals from the RV exterior
Time: 1 hour
Cost: $10
If there’s one thing that makes an RV seem dated and old, it’s ugly decals on the exterior. While the thought of scraping off all of those decals with a razor blade sounds like torture, there really is a better way.

We just got one of these eraser wheels that hooks up to our cordless drill for crazy cheap on Amazon. I can’t believe how well the decal eraser wheel works. I removed all the decals from our door in less than 2 minutes, and the ugly peeling birds and sun on the wall were gone in just a few minutes too. I think that to remove all the decals from the outside of our trailer (26 feet long), will probably take about 5 wheels since just like an eraser, they get smaller with every use.
Although we haven’t yet removed all our old decals (just the really bad ones), the most important tip we have is to keep moving the eraser back and forth so you don’t rub through your paint or fiberglass.
8. Add some green
Time: 10 minutes
Cost: $10-$15
While I know that most people don’t think that plants and RV travel mesh, hear me out on this one. If you’re wanting your RV to feel more like home, adding in some plants is a great way to do it. Succulents in an RV are great since they don’t need much attention or water, but fake plants can also be a great way to bring some life to an old RV.
To make your plants stable while you’re driving, make sure to grab some museum putty to hold it in place, so you don’t have a huge mess when you stop (this stuff is seriously amazing). You can also mount your plants to a planter on the wall, or get a plant hanger for your RV.
9. Recover or reupholster your RV furniture
Time: 3-4 hours
Cost: $30
Not sure what it is about RV manufacturers and their love of dark colors and all things plaid, but RV upholstery usually drives me crazy. When we got our RV, it was all a dark plaid, and I knew that it was one of the first things that needed to be changed. Luckily for us, the cushions were all in pretty good shape, so we could reuse those.
Reupholstering your own RV furniture does require basic sewing skills, but nothing too complex.
While there are tons of people out there who say to recover your RV upholstery with a painters dropcloth, I recommend avoiding that. We planned on doing that, but after prewashing our dropcloth, I was amazed at how quickly it had fallen apart. In an RV, the dinette and the couch will be getting the most wear and abuse of any piece of furniture, so you really need upholstery that’s going to LAST.

After my failed attempt at using a drop cloth to make covers for our RV furniture, I went to my local Joann fabric store. With a coupon in hand (get their app – the coupons are SO GOOD), I scored some amazing suede velveteen type upholstery fabric for less than $4/yard. It only took me 6.5 yards to cover both our sofa and our dinette cushions so it was an amazing deal. We reused the backs and zippers of the old dinette cushions and that process probably took about 3.5 hours, including several mistakes I had to unpick.

Recovering our jack knife RV sofa was a more difficult process, but still only took about 4 hours.
If you’re not up for busting out the sewing machine, these stretchy slipcovers look they would be an excellent option for recovering your RV sofa, and the price is incredible.
10. New window coverings
Time: 3-5 Hours
Cost: $100+
Don’t like the box valances or mini blinds that came with your RV? It’s really not too hard to remove and replace them. I put one of my kids in charge of removing all the old window coverings and valances from our trailer, and the whole job was done in less than an hour.
When you install new window coverings in your RV, there are so many different options. Whether you want new blinds, curtains, or even roll up shades, this all comes down to budget and personal preference. This article all about RV window treatments is amazing and will surely give you lots of inspiration.
11. Ditch the wallpaper border
Time: 2-5 Hours
Cost: Free
If you want to update the look of your RV walls without painting or recovering them, the fastest way to do this is by removing the wallpaper border. Now I must warn you that RV wallpaper borders are stuck on TIGHT! When we were removing ours we tried and tried all sorts of things including soaking them with basically every solution possible, using a scraping knife, scoring them, and none of it worked well (though plenty of other people have great luck removing theirs).

We later learned the trick of using a heat gun to remove RV Wallpaper. If we had used on, we could have had the job done in about 25 minutes instead of hours. The best way to remove a wallpaper border is with a heat gun. You can get a heat gun to remove wallpaper for about $20, making it a great investment considering it will save you hours of frustration and so much headache having one from the beginning. Slowly work your way down the wallpaper, moving the heat gun back and forth and peeling back the border. When you finish with the heat gun removing the wallpaper, bust out your Goo Gone, and a bit of elbow grease to get rid of the remaining sticky residue.
12. Install new hardware
Time: 1 Hour
Cost: $30
In our travel trailer, we decided to paint the entire thing to refresh and renew it – which is a job that’s far from simple or quick (it took 3 very long and intense days of work). If you want to add some wow to your RV without the hassle of redoing the cabinets, consider just updating the hardware.
When sold individually, new cabinet hardware for your RV will cost you between $4-8 per piece, if you buy your cabinet hardware in bulk, you can save TONS of money. We updated all of our hardware for about $30 in our trailer and it makes such a significant difference in the overall look of things. We’ve found amazon to be the best place to get cabinet hardware, and can typically get a set for a great deal there.
Here are some of our favorite cabinet pulls and knobs:


13. Redo your Shower and Tub
Time: 1 Hour
Cost: $13
Most RV’s have the same problem in their bathroom area with their bathtub and shower surround turning a yellowish color. It’s incredibly unappealing and can make your whole bathroom look old and dirty. The fastest thing to update them is to quickly refinish them with appliance spray paint (yes, this project is incredibly fast).
First of all, thoroughly clean all the surfaces with Lime Away. This cleaner is amazing and was able to get rid of most of the yellow coloring on our tub with only about 5 minutes of work from me and my scrubber. Cleaning your tub with Lime Away may even save you from needing to refinish at all!

If you do need to refinish your tub and shower, I highly recommend doing it with an epoxy spray paint. Yes, you literally can refinish your RV shower with spray paint. We used this appliance epoxy which is virtually bulletproof. We did a lot of research on different paints that could work in the tub and shower area and this was the most recommended. After 3 years it’s still holding well and doesn’t have a single chip in it. I seriously can’t believe how smooth and hard the finish is, so I rave about it to everyone.
Here are some tips that I learned from refinishing our RV shower with spray paint:
- Don’t use regular spray paint – this is the stuff to get – our shower area took 2.5 cans and I did 3 coats.
- Wear a respirator or several masks – this paint is super toxic. Also, make sure to step outside often for air
- Tape off EVERYTHING that you don’t want paint on (even the door behind you and the toilet…even the hallway). The particles from this stay in the air for a while and once they stick to something, it’s basically impossible to get it off
- Cover yourself – your hair, your arms, your skin. I learned this the hard way and ended up using lots of acetone as well as a scrub brush in the shower for over an hour scouring the paint bits off of my skin. Don’t make the same mistake that I did!
- Plan on getting it done quickly. The paint needs to have all the coats done within 1 hour or AFTER A WEEK! Do it fast!
- Let the RV air out overnight. The fumes are intense and took a while to dissipate. Don’t plan on doing work inside the RV for the rest of the day.
14. Organize your Area
Trying to fit everything that you need for a weekend in your RV feels daunting at times, let alone living in it for extended trips. Trust me, I feel the pain – we have 7 of us living in a 26 foot travel trailer when we hit the road. When it comes to living in an RV, organization is essential, so I turned to the pros – friends who LIVE in their RV! Yes, if you want to figure out the best RV storage and organization, you first need a plan. My friend Jill lived in her RV for years with her 4 kids and is an expert at RV organization and storage. Her RV Organization Guide is packed full of fantastic tips, and saved me from making so many silly mistakes (and wasted money) when we were trying to figure out how to organize our RV.
Everything needs a place and you need to communicate exactly where that space is. For our family, everyone has a space where they store their clothes ans personal belongings. Having lightweight fabric storage cubes in different colors helps us keep everyone’s things separate.
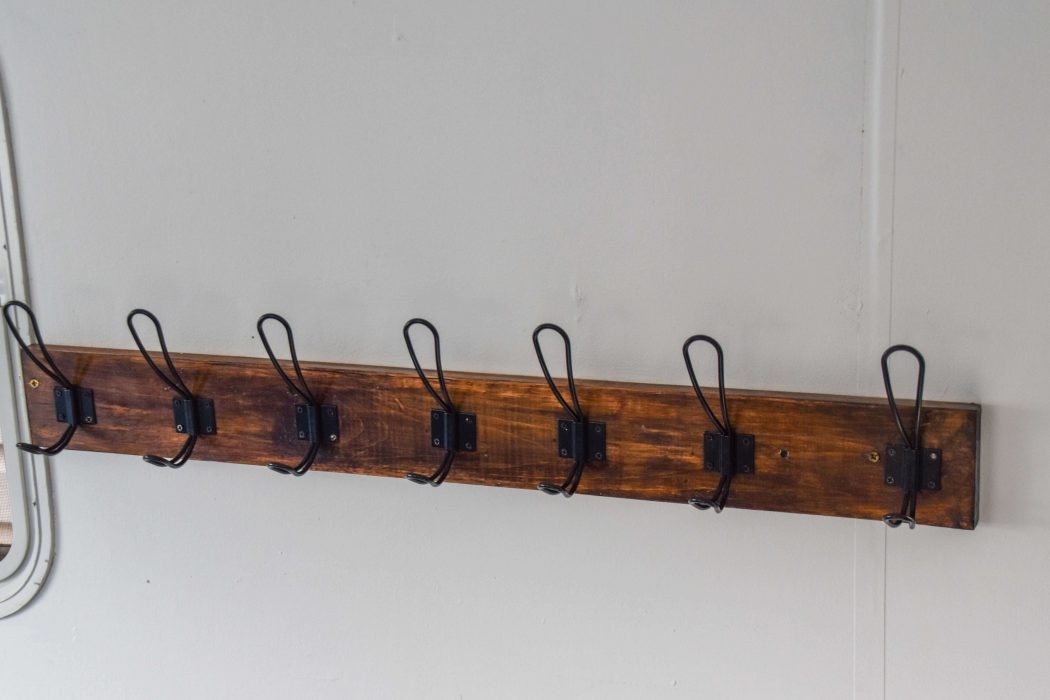
We also have specific areas for coats and hats so that they don’t just get dumped on the couch, as well as a big bin outside for everyone’s shoes (one of the biggest sources of clutter in our RV).
Filling our cabinets with plastic bins like these, as well as magazine file folders for taller storage helps keep everything within the cupboards neat and easy to find. We bought most of our bins at the Dollar Store, so I recommend checking there first to see if you can find something that might work well.

15. Personalize Your Space
One of the best ways to make your RV feel like HOME is to add a bit of personalization. I love all the peel and stick vinyl wall accessories available right now, and I ALWAYS love a good map, and this map has a really personal and unique touch!

Whether you’re looking for a cute letterboard or chalkboard, some family photos, or even your eclectic magnet collection, go ahead and add it to your RV! Maybe you love coffee and want to get a great RV coffee maker. Throw all the design rules you know out the window and make your RV a place where memories are made and shared!

Feeling inspired yet? One of the best things is that you can do all of these RV updates in less than a day, and each will have a major impact on how your RV looks and feels. Good luck!


Love this!!! Thanks for sharing your great ideas. I have been going to my cousins trailer for the past couple of years and wanted to freshen it up a little this year I’m feeling inspired and the juices are flowing
The interior of an RV is significantly impacted by water damage or sudden downpours because moisture accumulates on the walls and causes yellow stains on the wallpaper. RV owners must understand how to match RV wallpaper in a travel trailer because of this. In order to restore the beauty of a wall, wallpaper is far superior to conventional paint.
On the contrary, I find that the moisture in the rv helps it to release the wallpaper. When I do it again, I will use paint and paint on the wallpaper.
Great article! I’m about to upgrade our 1993 Mallard! What did you do for your counter tops? Your RV looks great! Thanks for sharing your story!