This post may contain affiliate links where we earn from qualifying purchases. As an amazon associate, we earn from qualifying purchases. Find out more in our disclosure.
Do you have BIG DREAMS of doing an RV remodel on a budget? Good for you! There are so many great ways to do an RV renovation on a budget that allow you to completely customize your RV to your style and the features that you need. Compared to most home renovations, doing an RV remodel is so much easier and faster, so just about anyone can do it!
We’ve been dreaming of getting a trailer and traveling around North America for close to a decade. As the years have gone, and our family has grown, that vision has changed and evolved from van-life, to a fifth-wheel, and now with 5 kids and fewer tow vehicle options, we started looking for a travel trailer.
Instead of spending $50k to get a travel trailer that worked perfectly for our family, we decided it was best to get an old travel trailer and remodel it, and we were amazed at how fast we could get this budget camper renovation done.
TIP: Before you start your RV Renovation, come up with a plan for how you’re going to organize things. RV Organization is a critical step that most people overlook when doing an RV Remodel. We love this RV Organization Guide because it’s got some of the most brilliant ideas for how to store all your things from a family of 6 who lived full time in their RV for years! We always recommend starting with this guide and then coming up with your RV renovation plans. If you use the code bringthekids you can get 15% off your guide.

SPOILER: Head here if you want to jump right to our favorite budget travel trailer products or keep reading for detailed information.
Is It Better To Buy A New RV, Or Remodel An Older RV?
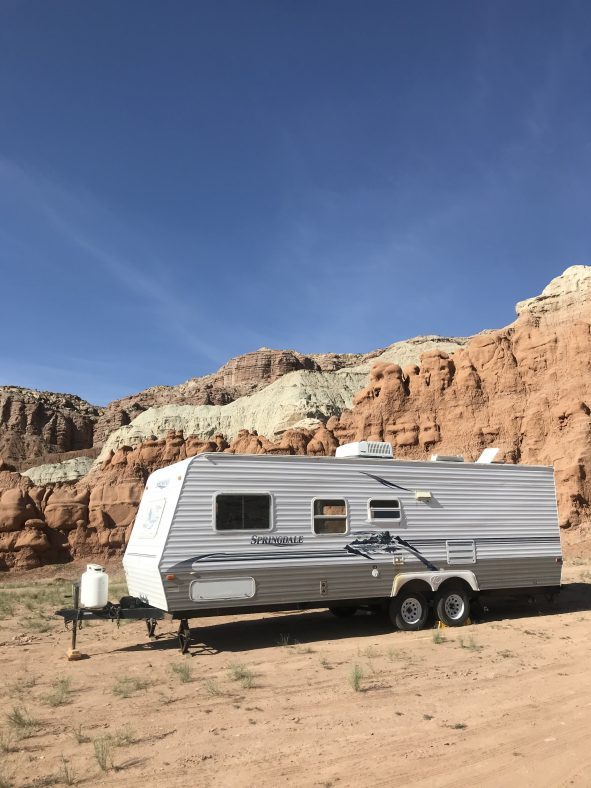
We looked for almost a year before we finally bought our trailer for our big RV renovation in the spring of 2020. Yes, right when everything was crazy with COVID, and finances were uncertain. So, we changed our plans again away from the dream trailer we had picked out, to something much simpler…and also much older and uglier. While there are advantages to getting a new trailer, our trailer was about 15 years old and cost us 1/5 the price of a new trailer.
If you want to buy a budget used RV for a renovation, make sure that it’s structurally sound without any water damage or electrical problems and that all of the appliances work properly. These are some of the most expensive repairs, so the more you can avoid those, the more money you’ll save.
We wanted to pay CASH for our trailer, so getting a cheap trailer and fixing it up worked perfectly into our plans. (Read all about how to find an RV or Trailer for cheap HERE). As it turns out, remodeling an old camper was a great fit for our family, and the kids are so proud of the RV renovation.

How Long Does It Take For An RV Renovation on a Budget?
RV renovations can vary drastically based on your RV’s condition. If your RV is structurally in good condition and doesn’t have any water damage, it will be much easier and faster to complete an RV renovation. Many older RVs have a very outdated interior, so that’s where you can have the biggest impact when doing an RV renovation.
While we were so excited about our RV remodel for cheap, my husband was CRAZY busy at work and would have almost NO TIME to help me. So it was just up to me and the kids to renovate the RV.
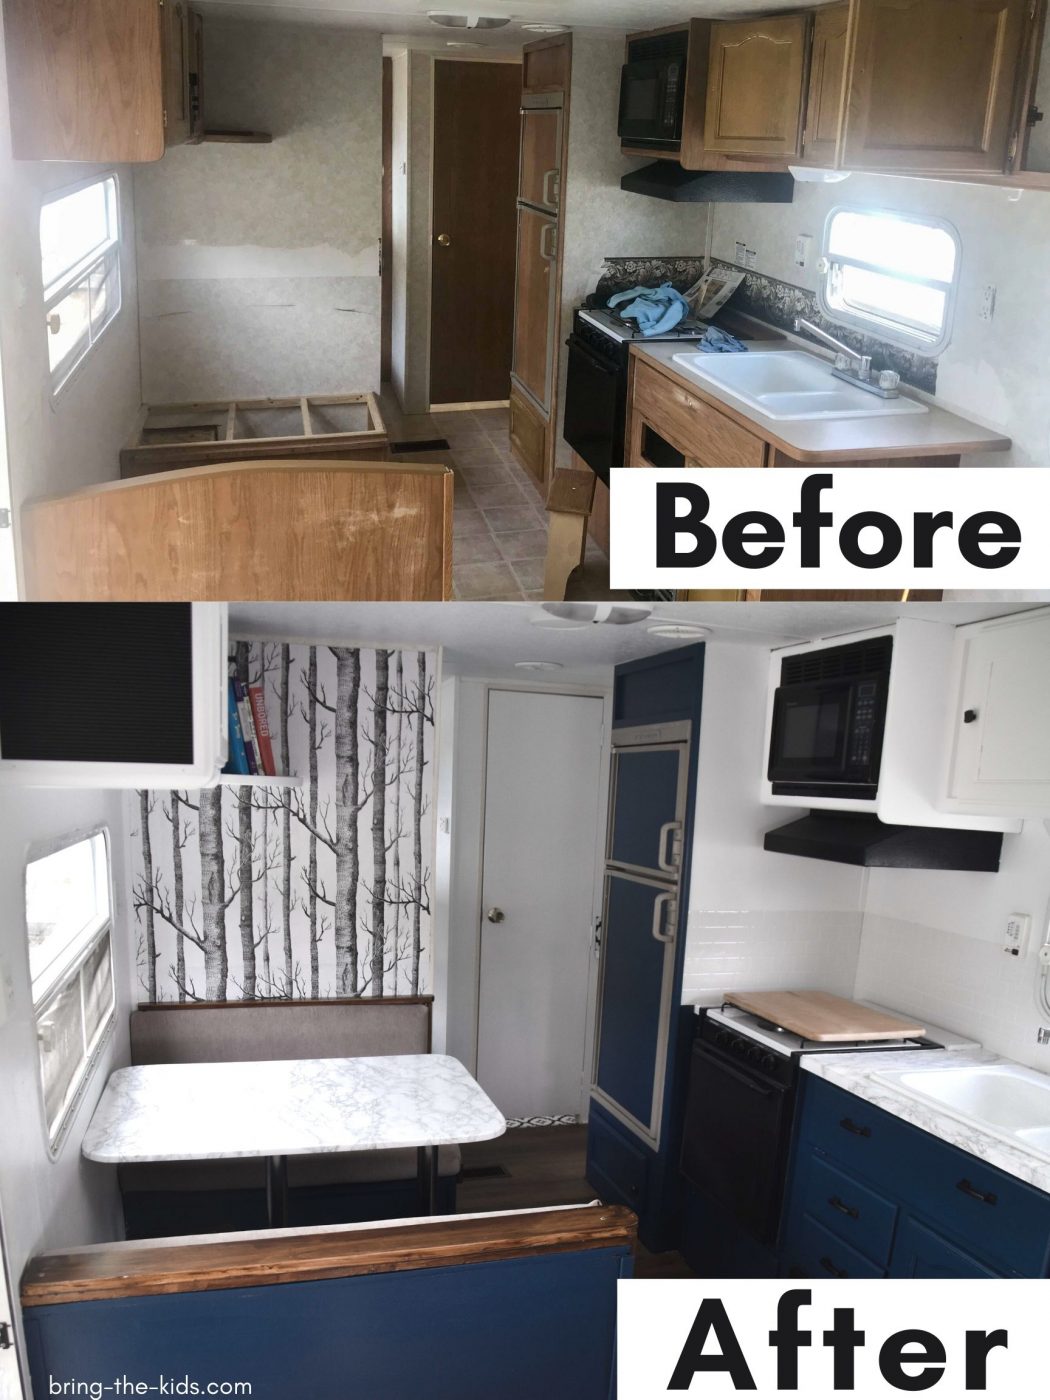
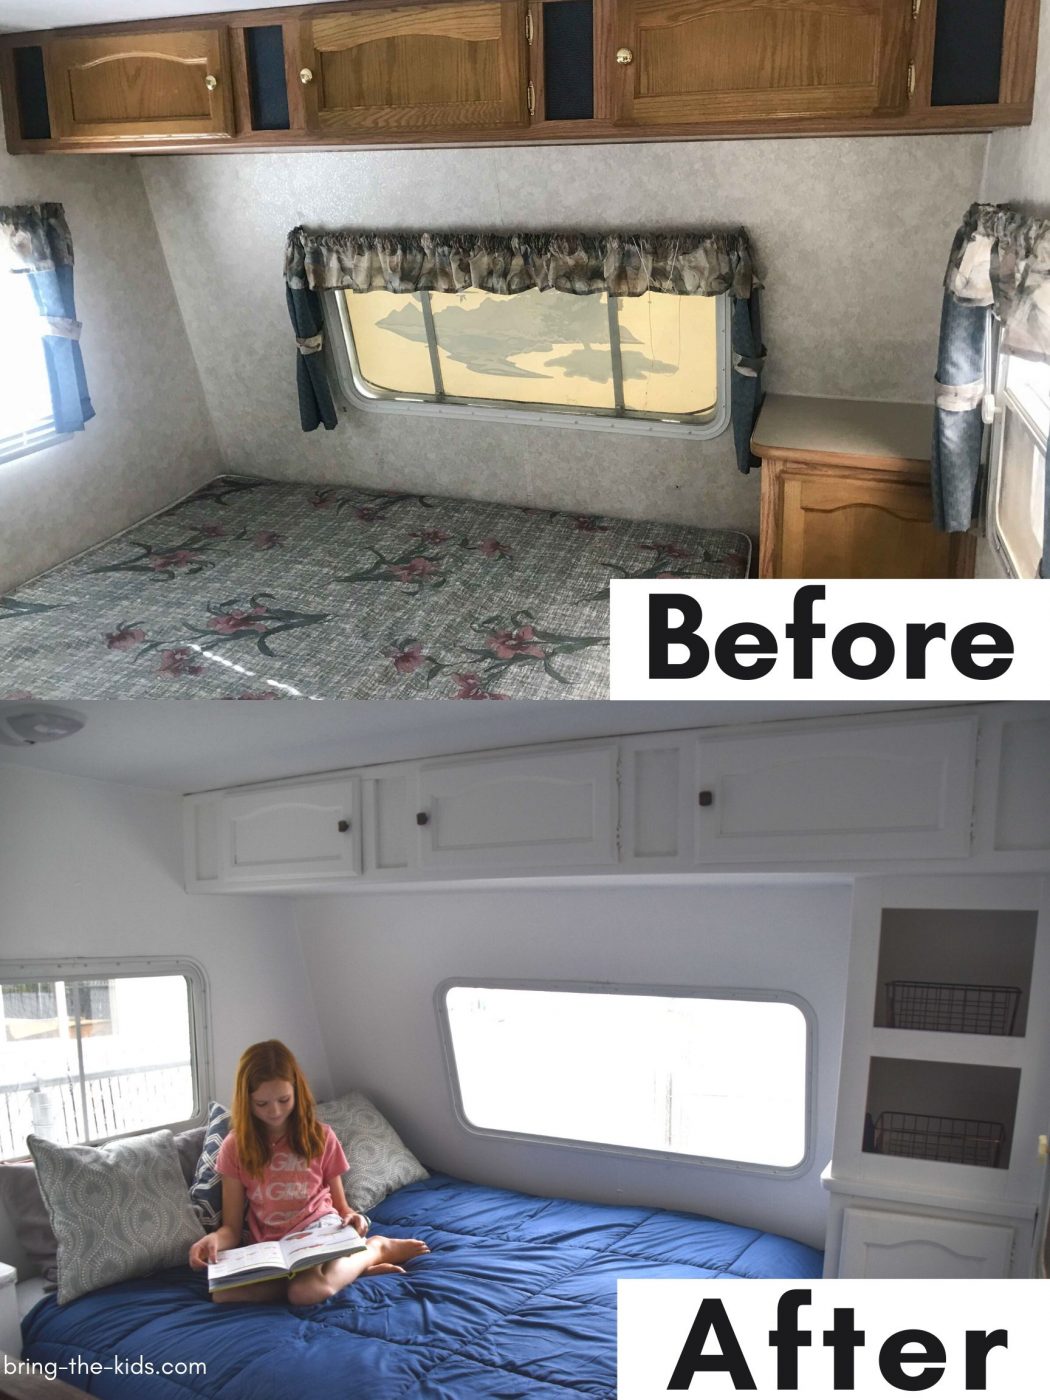
Here I’m going to share with you exactly what we did on our interior RV renovation in just one week. Yes, we knocked this project out in just 7 days, and 99% of the work was just done by me and our 5 young kids (ages 3, 5, 7, 10, and 13).
Note that we didn’t do any structural work to our RV budget remodel and technically, all of our work can be considered “cosmetic” since it’s just on the RV interior. We painted walls and cabinets, reupholstered furniture, refinished the countertops and table, installed new flooring, and reconfigured and added a few storage options.
Yes, my husband helped for a couple of things where I needed an extra set of adult hands, but this project was almost exclusively done by just a mama and her kids – IN ONE WEEK! I still can’t believe we were able to get it done so quickly. Even better, we were able to do our RV remodel on a tight budget.
Honestly, nothing that we did was incredibly hard, so ladies if you’re wanting to tackle an RV remodel, it’s absolutely something that you can do – don’t be afraid of remodeling your RV.
What Is The Most Difficult Part of a Camper Renovation?
The most difficult part of our camper remodel was the painting since it took so long. Painting an RV for a camper renovation seems like an easy task, but considering how small they are (ours is a 26 foot trailer with no slide out), there is a ton of storage space that needs to be painted as well.
It took us 1 day to do all our RV cabinet painting prep work and priming and then 2 more days to take care of the painting on our camper renovation. The old oak colored RV cabinets were really hard to cover with white, so they took 1 coat of primer and 4 coats of paint.
If you want to update your old RV, but don’t want to do a complete RV interior remodel, make sure to check out our article on 15 RV Updates You Can Do In One Day. It has lots of easy projects, and most of them can be done in just a few hours time.
Here’s our process that we went through and everything that we used on our complete RV/camper/travel trailer remodel (or whatever you call it where you live:). Hopefully you get some inspiration for how to remodel an RV on a budget and renovate a camper as well as some interior design tips for RV’s.
Make sure to check out our other RV Resources:
30 Easy RV Meals That Taste Incredible
15 Simple RV Updates You Can Do In One Day
9 Secrets To Buying A Used RV For Cheap
- Is It Better To Buy A New RV, Or Remodel An Older RV?
- How Long Does It Take For An RV Renovation on a Budget?
- What Is The Most Difficult Part of a Camper Renovation?
- First Things First: Deep Cleaning The RV
- Removing an RV wallpaper border
- Prepping The RV For Painting
- Priming RV Cabinets
- Painting RV walls and cabinets
- Refinishing the RV Bathroom Shower
- Installing vinyl plank wood flooring
- Installing new bathroom floors in the RV
- New RV Cabinet Hardware
- Travel Trailer Backsplash Installation
- Adding Wallpaper To An RV
- Recovering the cushions and couch
- Covering The RV Countertop
- Changing RV Mattresses For Regular Mattresses
- Organizing the RV
- Extra Storage in an RV
- Wood Trim Pieces
- Total R-V Remodel Costs
- What Skills Do I Need To Renovate A Camper?
First Things First: Deep Cleaning The RV
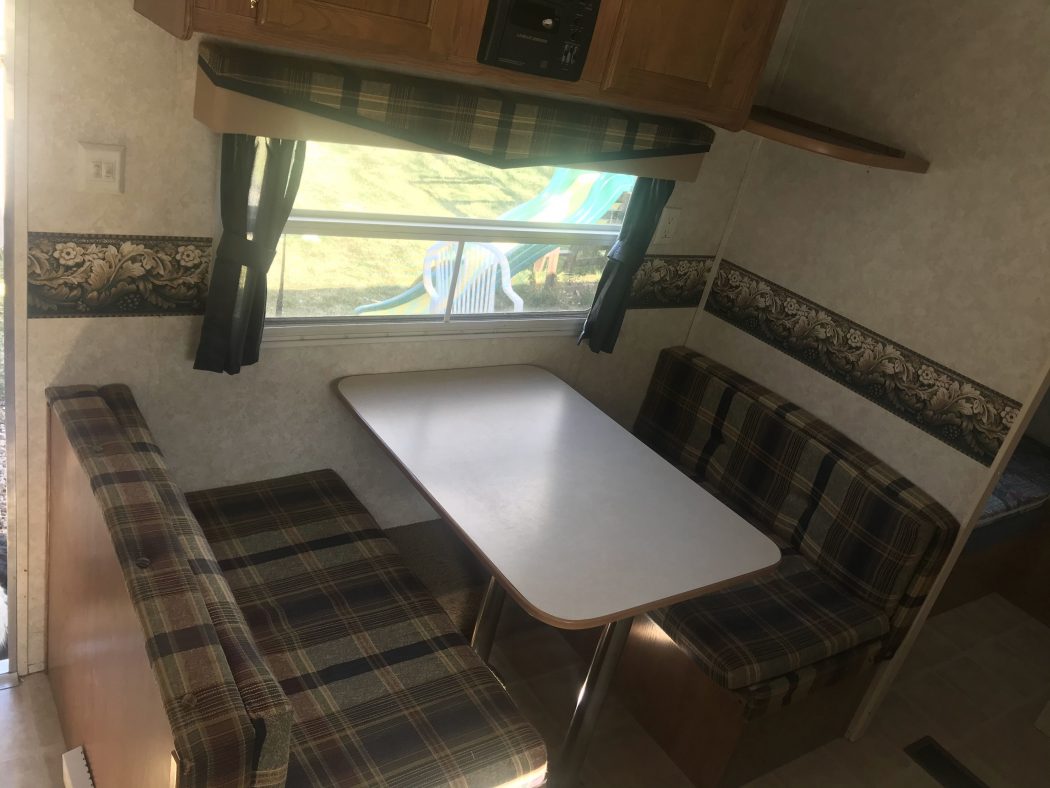
Before we got started on any of our camper remodeling, we did a super deep clean of our RV. That included taking out old RV window coverings, getting rid of the nasty shower curtain, and taking out all of the old mattresses, cushions and even the table.
We simply stashed everything in the garage in case we decided to reuse any of it later in our RV project. We wanted to start our camper remodel project with a clean slate, so we removed as much as possible from the RV.

Removing the window valances from the RV during our camper remodel completely opened up the lighting and was such a quick fix. I gave one of the kids the drill and all the window coverings were down in about 45 minutes.
To clean our travel trailer out, we first went over everything with a combination of vinegar and water and a bit of Dawn dish soap in a spray bottle. With all 5 kids helping me, this only took us about 30 minutes.
Next, we started doing a bit more of a deep clean on all the cabinets and kitchen area. We used Greased Lightning Cleaner and Degreaser for this and I love what a great job it did, especially of cutting through the caked on grease in the kitchen area. You could also use something like Krud Kutter or Simple Green for a similar effect. DO NOT SKIP THIS STEP!!
Since we were going to be painting the cabinets, it’s super important that we got EVERYTHING totally cleaned off. I started the kids off first and then I went over everything after they did to get any spots that they missed.

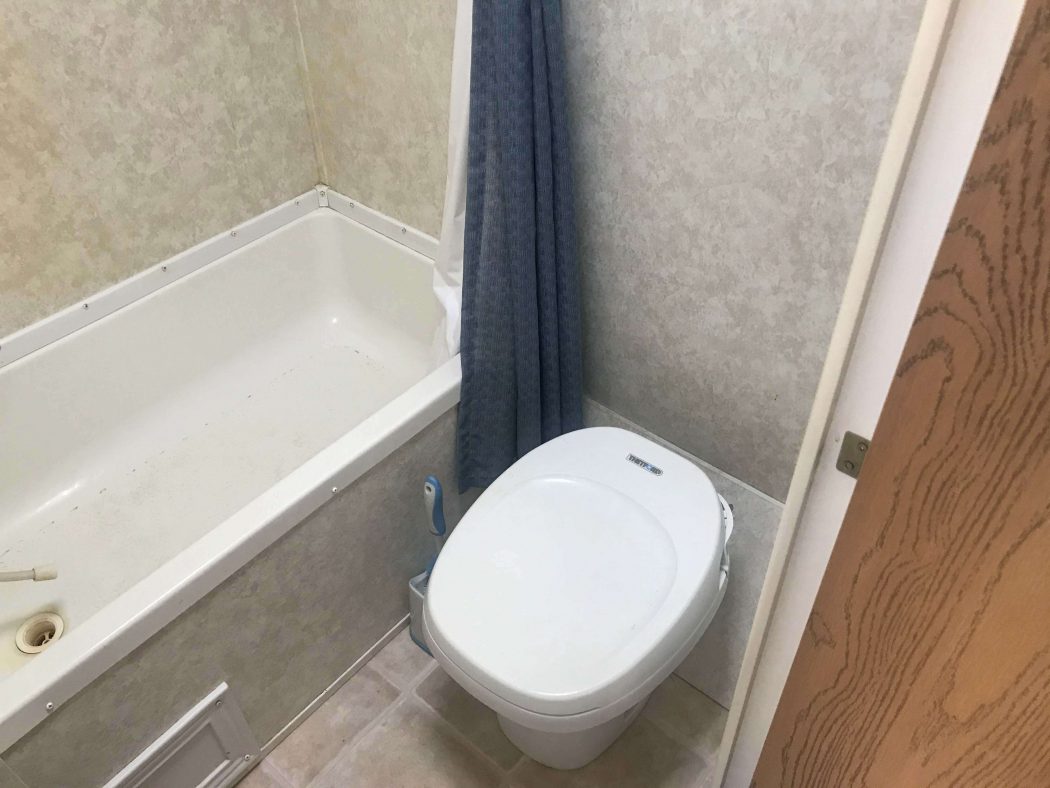
Cleaning the bathrooms was another chore altogether, and one that I did by myself since it was a bit more toxic. When we bought the travel trailer to remodel, I was convinced that we were going to have to replace or refinish all the sinks, tub and maybe even the toilet. They just looked SO BAD. I really wish I had more pictures of how bad they were, but just trust me!
There were rust stains on just about everything and all of the white finishes were more of a yellow color, which just made everything look old and dirty. So I busted out my favorite crazy good bathroom cleaner Lime Away. I’m quite convinced that this is the most incredible cleaning product of all time, so I knew if Lime Away couldn’t clean our sinks, nothing could.
Can I just say that I was blown away. If you’re thinking about replacing or refinishing your RV sink or tub, make sure to use this FIRST. Our sinks went from nasty and gross to looking brand new within a couple of minutes (and not too much scrubbing on my part). Suddenly, I knew that our task just got so much easier since I wasn’t going to have to refinish our RV tub and sink. WAHOO!
Total Cost: Greased Lightning $4.50, Lime Away $4 = $8.50
Removing an RV wallpaper border
“Oh, just go head and pull the wallpaper border off”, I read. “Removing the wallpaper border in your RV is the easiest transformation,” another writer said.

Well they lied.
Removing the wallpaper border in our RV was insanely difficult and took a solid 4 hours before I finally threw in the towel (we were only removing about 8 feet of border, so that’s ridiculous). No matter what I tried, I couldn’t get the border to come off well during our camper renovation, and in the places that I could, the residue was so bad that it looked even WORSE.
The only thing that made any sort of difference in removing our wallpaper border was using a very hot blow dryer, which helped to peel it off, but the adhesive still wouldn’t come off, regardless of what I tried.

Eventually, I just used some vinyl spackle we had at home, and slapped some on top of all the horrible mess we made of the wallpaper border and smoothed it out. Obviously NOT PERFECT, but spending a few days on a dumb border, just wasn’t in the cards for this camper remodel.
If I had to do it again, I would leave the wallpaper border on in our RV and just PAINT OVER IT!

Prepping The RV For Painting
Once the trailer was totally cleaned out, all I really wanted to do was PAINT, but I knew that paint prep was going to be essential. In order for paint to properly stick to RV walls and cabinets, proper prep work is essential. To do this, we first cleaned like I just mentioned, but then we sanded down all the cabinets and woodwork so that they paint would adhere better.
The easiest way to sand the cabinets in an RV is with sanding blocks. We grabbed a set on clearance at our hardware store and I cut them in half with scissors so that they were easier for the kids to use. Sanding blocks are so much easier than just sandpaper since they don’t tear, are easy to hold, and you can rinse them out so they last a really long time.
Just like with our cleaning, I had the kids go over everything and then I followed behind to get the places that they inevitably missed. On a few of the really large pieces of woodwork, we used our electric sander, but it didn’t save us too much time over just using the sanding blocks, so it’s definitely not a necessity.
Between paint prep and wallpaper removal, we were getting a bit frazzled. We had been working ALL DAY (It was mid afternoon), and hadn’t made any visible progress. I told the kids that if they hurried and did one more clean of the trailer (to wipe down from sanding), we could paint today (well at least prime it).
They were so thrilled to paint that I’ve never seen them clean so quickly (lots of good music helped too).
Total Cost = 2 rolls of blue painters tape = $7
Priming RV Cabinets
The walls and cabinets in our RV were all being painted, so we quickly got to work. Most of the areas in our trailer were being painted white, so we used a Kilz white base primer, but a few areas were going to be painted blue, so we used a gray tinted primer from Kilz there.

Since we were going to be replacing the floors and recovering the sofa, I didn’t even worry about covering those (you can scroll down to see the massive paint mess on the floors below).
We knew that letting our kids help paint our RV would mean that the paint wouldn’t be perfect. There would be spots missed, paint spilled and plenty of drips. But you know what?
We aren’t just remodeling our trailer – we are teaching our kids to work and take pride in the job they’ve done.

Total Cost: 2 gallons of Kilz Primer at $17 each = $34
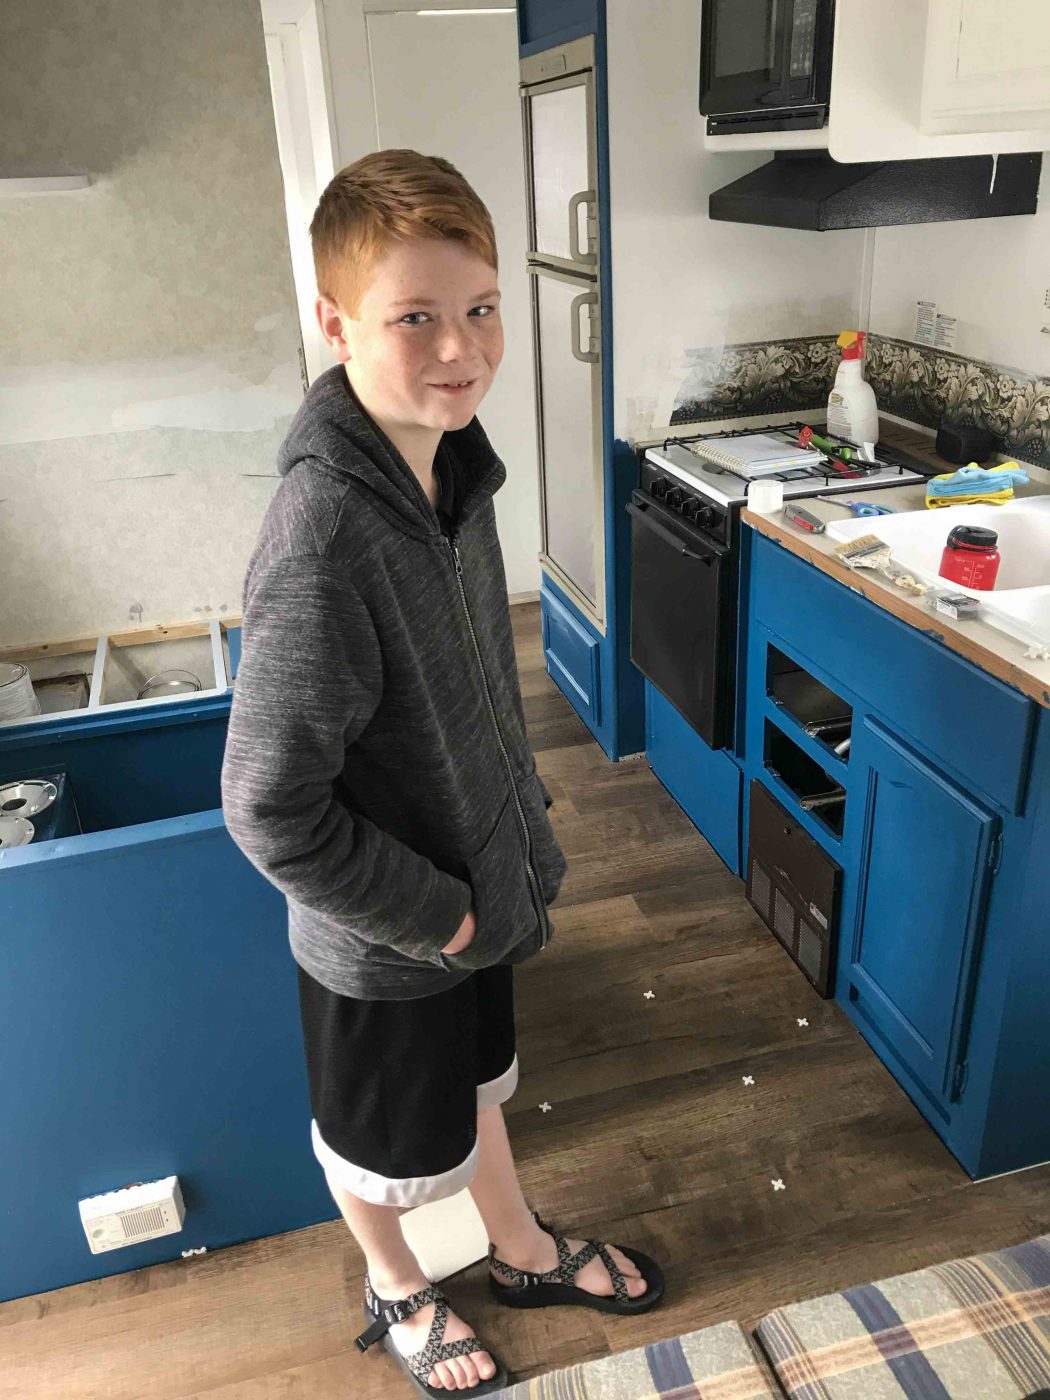
Painting RV walls and cabinets
The next day, we moved on to painting our RV. It was seriously such a massive mess, and was a major lesson in both patience and letting things go for me as a mom. The kids basically wore the same “painting clothes” all week, which I promptly threw away when the project was finished.

We had paint just about everywhere imaginable, but the kids thought it was the best thing EVER. They loved picking a spot and painting it and showing everyone what a good job they’d done – it was awesome.
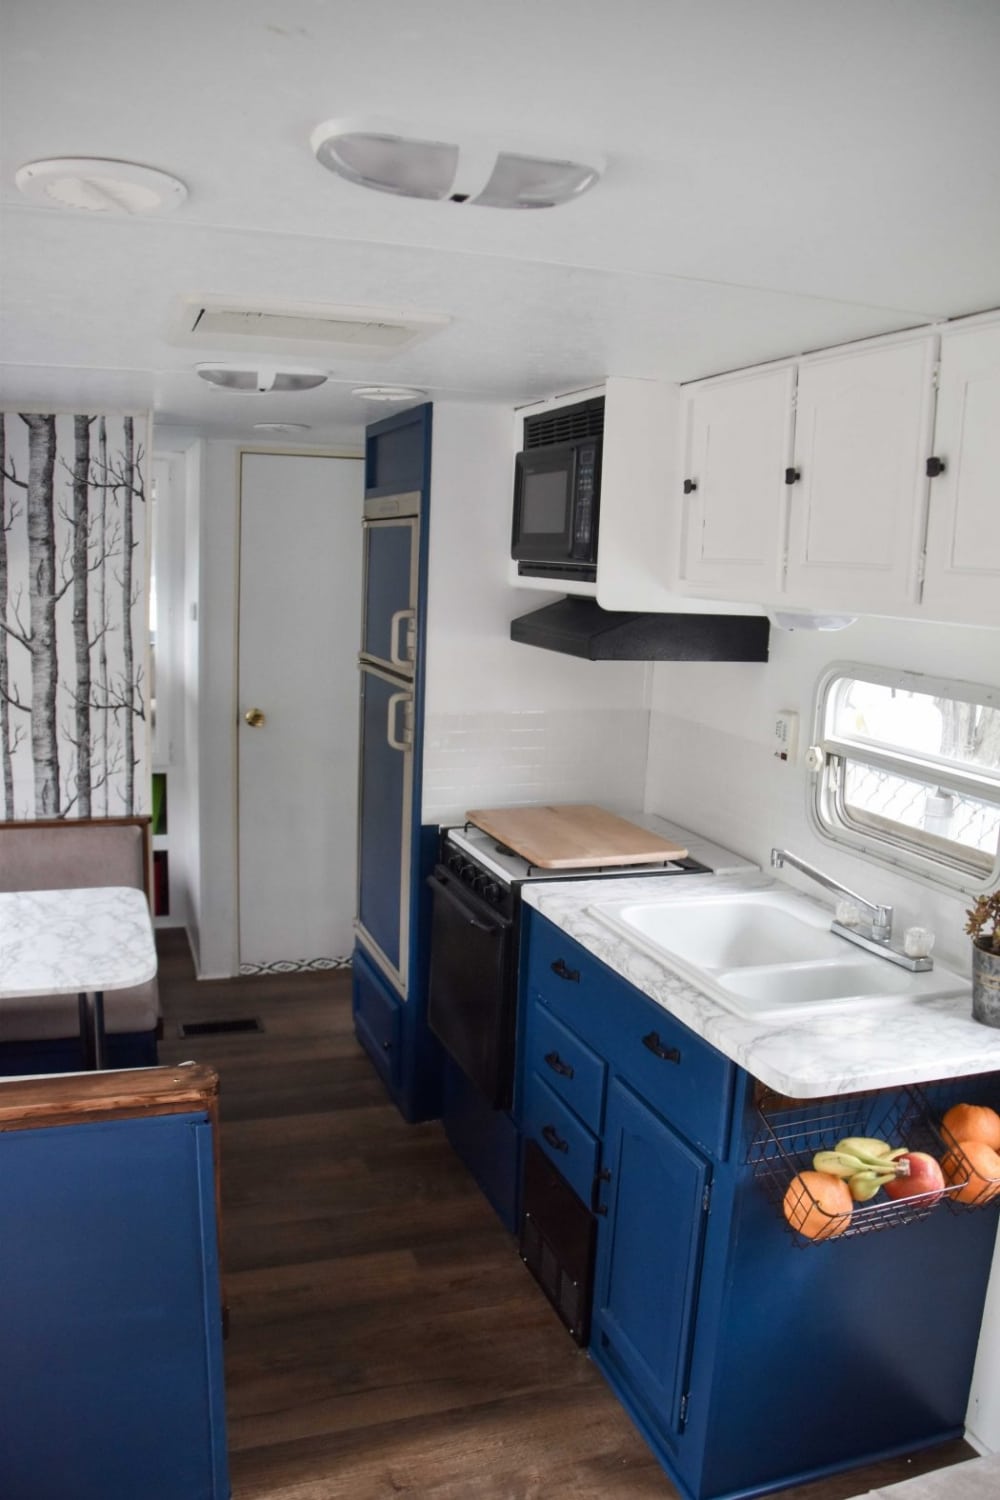
For the white, we used Glidden Premium paint from Home Depot in their Pure White Base. I love this paint because I think it works as well as Behr paint, but it’s about 50% less money. To paint all the walls of the trailer and a majority of the cabinets, we needed 2.5 gallons of paint.
For the blue, we used Glidden Premium Satin paint in Mountain Lake…and then I decided that I didn’t love the color so I ended up repainting the blue with Do It Best’s Deep Pacific color in a semi-gloss finish. I went back and forth a lot on redoing the paint (it was completely FINISHED when I started to have second thoughts), but now I’m so glad we repainted it QUICKLY and just got the job 100% done.

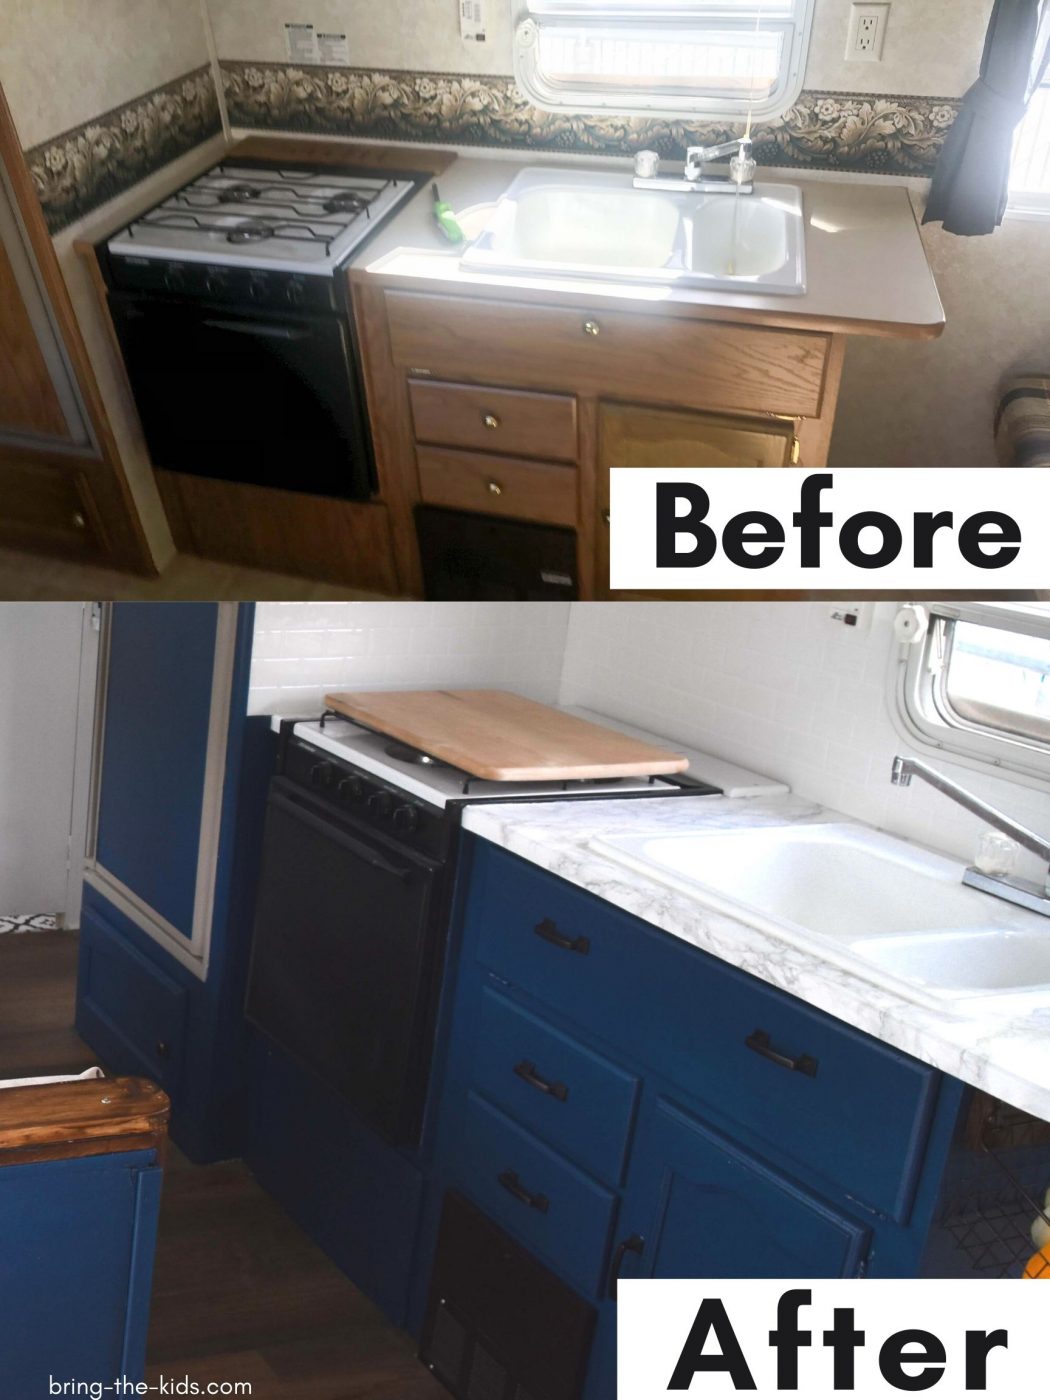
We painted the dinette, the lower cabinets, and the refrigerator dark blue, which ended up taking about ⅓ gallon of the Glidden paint, but only 1 quart of the Do It Best when I repainted it.
Total Cost: 4 Gallons of Glidden Paint at $22/Gallon + 1 Quart Do It Best at $16/quart = $104
Refinishing the RV Bathroom Shower
Above I mentioned that I didn’t have to refinish our RV shower because Lime Away basically saved us. It’s a miracle cleaner. The only catch was that we still had to work on our shower area, because instead of a nice shower surround, our RV only had regular walls in the shower and around the tub, which just seemed like water damage waiting to happen (especially with kids).
I’d been doing a lot of reading and had stumbled upon a recommendation to use Rustoleum Appliance Epoxy spray paint to refinish a shower. It was supposed to be a super hard finish and best of all waterproof. The only downside is that it all needs to be recoated within a 1 hour window or after 1 week of waiting, so I had to work fast.
I had read that this spray paint was kind of smelly, but that’s a major under exaggeration. If I had to use this again, I would use a respirator. After taping everything off (or so I thought, I got to work). It took me 2.5 cans of the spray paint to cover the whole shower surround area, doing 3 coats.

When I finally finished, I realized that the whole trailer was filled with epoxy spray paint particles that were slowly settling EVERYWHERE. I quickly got out the acetone to clean it off of the fridge in the hallway, the bathroom counter, and the toilet lid, and even my phone that was sitting in the kitchen. I completely lucked out that we hadn’t refinished our flooring first, because it would have been ruined.

If you use this, make sure to tape and cover EVERYTHING. Oh, and wear a head covering too along with long pants and long sleeves and gloves…it took me 8 hair washes and 45 minutes of scrubbing to get the paint off of my body. If you look closely at this picture, you’ll see how everything on the front of me is “frosted” and my hair has a newly flocked look as well. Don’t make the same mistake I did!

The good news is, that it’s crazy fast, and the finished product is AMAZING! So yes, all the mess was 100% worth it!
Total Cost: 3 cans of epoxy spray paint at $4.48 each = $13.44
Installing vinyl plank wood flooring
For the flooring, we decided to install vinyl planks that have a look like wood. I’d love to tell you that we chose this flooring because it was just the perfect match, but the reality is that we found a crazy good deal on Facebook Marketplace for it, so we snagged it quickly.

The best part of using this type of flooring is that you can put vinyl plank directly over the old linoleum in your RV (as long as it’s in decent shape). People often wonder if you can put vinyl planks directly over linoleum and the answer is YES! That made our project so much easier and significantly faster than other types of flooring where we would need to remove the old linoleum.
The flooring that we used was called CORE LUXE vinyl flooring in Farmland Hickory, but it appears to be discontinued most places. The coloring is very similar to this flooring from Home Depot.
We started at the back of the trailer and moved our way to the front, which seemed to work pretty easily from a cutting standpoint. Unfortunately, we had to make special cuts in about 80% of our planks, so that made it a little bit trickier, but still manageable.
Altogether it took my 13-year-old and I about 5-6 hours to complete the whole project, and we were definitely taking our time. The whole floor is a floating floor so it’s not actually attached anywhere on the floor. I wasn’t sure how that would work out in a small area like ours, but having a floating floor in an RV has worked out great so far.
The only tricky thing about installing vinyl flooring is that it expands and contracts with temperature differences, so you can’t install it right up to the wall. Since we know our trailer will be subjected to extreme temperatures on both ends of the scale, this was very important to us to leave room (we live in the mountains of Utah). What this means is that you need to leave a ¼” to ½” gap and put quarter round on the top of it.

If I were to do it again, I would absolutely invest in this kit, since getting the planks to fit together end to end was a bit tricky, and I know that having this pull bar would have made the job easier.
Total Cost: Flooring $60, quarter round $35 = $95 total
Installing new bathroom floors in the RV
The bathroom floors had a major WOW factor to them because we decided to go with a really fun tile pattern on our RV renovation. These actually aren’t real tile floors, but peel and stick vinyl tiles that work perfectly for an RV bathroom renovation. These tiles make installing a new bathroom floor in the RV, SO EASY! The tiles are about ½ cm thick and have a super sticky back to them.
All I needed to do was clean the floor really well (I scraped up the paint spills off the bathroom area, but not the rest of the trailer), and cut the tiles with a utility knife.
Since I had to work around the door frame and the toilet, I used our amazing gauge template (I’m kind of obsessed with this tool), to make sure that my cuts were all accurate and even.

Despite all my efforts, there were still tiny little cracks between the tiles that I couldn’t get to be completely flush. Since we have these tiles in the bathroom and I know water and other things will get onto the floor (ahem, I do have 4 little boys), I caulked between each of the tiles and along the walls so nothing could get in.
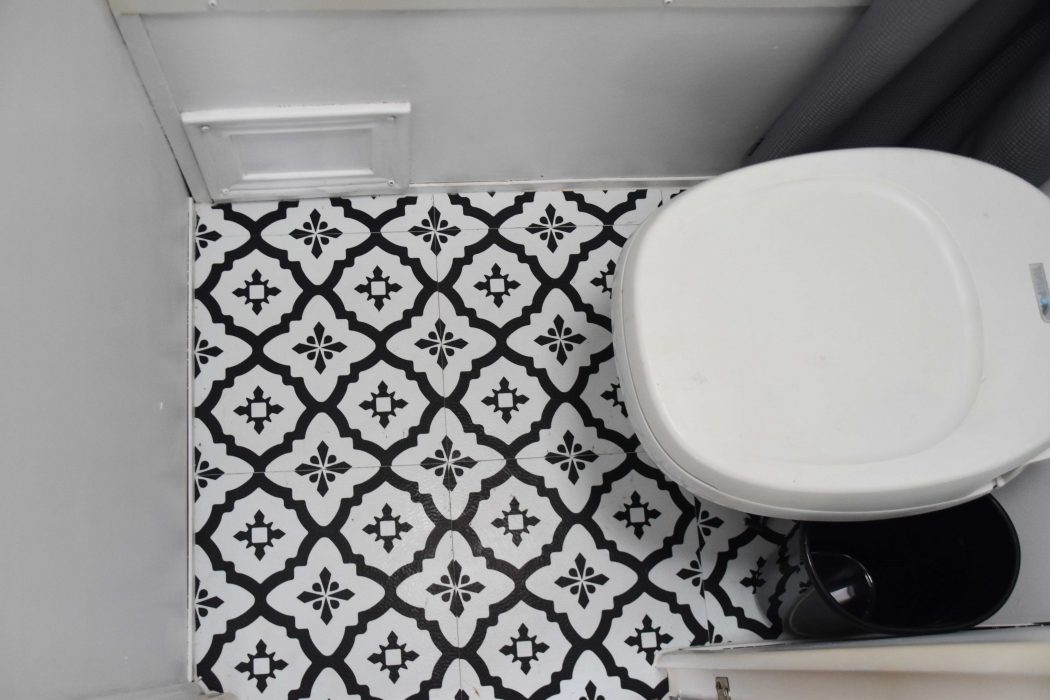
I ended up using 6 tiles on our floor and used the 4 remaining tiles to create a backsplash around our sink in the hallway. Note: The tiles didn’t stick as well to the wall and kept falling off. To help them stay in place, we sprayed the back with some 3m adhesive and caulked along the button and top, which seems to be doing the trick.
Links to products we used in this DIY camper remodel:
Tiles
Other tiles we loved here, here and here.
Total Cost: Tiles $10 and Caulk $4 = $14
New RV Cabinet Hardware
If you’re planning an RV makeover, regardless of what you are doing with your cabinets, the fastest way to update the look is to put new hardware on. It’s super simple and in most cases, we just used the existing holes from the old date knobs.

We went back and forth a lot on our hardware color for our R-V remodel, but in the end, chose an oil rubbed bronze since it had a more earthy feel (this is for camping after all). When pricing RV cabinet hardware out, we found that it was significantly cheaper to buy hardware in bulk on Amazon than to buy individually (about 4xs cheaper). For the drawers and bigger cabinets, we did this pull, and for the upper cabinets, we did this knob and I LOVE the shape.
RV hardware we used to remodel a camper:
Cabinet knobs
Cabinet pulls
Total Cost: Knobs $17 and Pulls $16 = $33
Travel Trailer Backsplash Installation
To really make our kitchen look nicer, I decided that I wanted to do a backsplash when we were remodeling the camper trailer. Much like other areas of our RV where we are trying to keep things flexible and lightweight, we decided to use a peel and stick backsplash.
Unlike our tiles for the bathroom floor, these tiles were super lightweight and felt cheap when I pulled them out of the package, which made me super skeptical that this part of our camper trailer renovation would actually work. They felt like kids puffy stickers that they would buy out of a vending machine. However, not seeing a better option (that wasn’t crazy expensive or difficult), we decided to install them.

The best part of our peel and stick backsplash is that we could cut the “tiles” with scissors, so it was super easy to go around windows and outlets. The whole process took about 1 hour.

Peel and stick backsplash tiles are significantly more expensive than the higher quality floor tiles that I installed in the bathroom. I bought a package of 10 tiles and needed 8 of them just to do one row. I was really hoping they would go farther, but since they’re pretty expensive, we stopped there (and may install more later on). After 1 year, I am incredibly impressed with how well these camper trailer backsplash stickers worked – they wipe clean easily and have all stayed put without coming off.
Products we used:
Peel and Stick Backsplash Tiles
Total Cost: 1 set of backsplash tile stickers $39
Adding Wallpaper To An RV
I know that most people are trying to get wallpaper away from their RV, but we decided to add wallpaper to ours. After the insane pain that it was to remove the wallpaper border from our trailer, I decided that we absolutely would not use traditional wallpaper, but instead would use peel and stick wallpaper (are you seeing a trend). We had used it in our rental home and love how easy it is to install and also take down if we want something different later on.
I’m a pretty minimalistic decorator, but when I saw this wallpaper, I absolutely fell in love. It felt like the perfect blend of minimalism and loving the outdoors. We only covered 2 walls, but it took us 4 rolls of wallpaper because we had to make sure that the pattern was matching up. If I had a pattern that didn’t have to match, I could have used just 3 rolls and been fine.
This was one of the few projects that I had to recruit my husband for since I needed an extra pair of hands that was actually tall enough to reach the ceiling. It wasn’t difficult, but do take your time, as we noticed that if we were in a rush we would end up with air bubbles.
NOTE: after a year of having this wallpaper on, we have had a few problems. When we had days of large temperature swings (40 degrees at night and 85 during the day), the peel and stick RV wallpaper started to bubble. To fix that, we pulled it down, and sprayed the back with a 3M adhesive spray and have not had any more problems.
Products we used:
Peel and Stick Wallpaper with Birch Pattern
Total Cost: 4 rolls of wallpaper at $10 each and one can of adhesive spray at $6 = $46
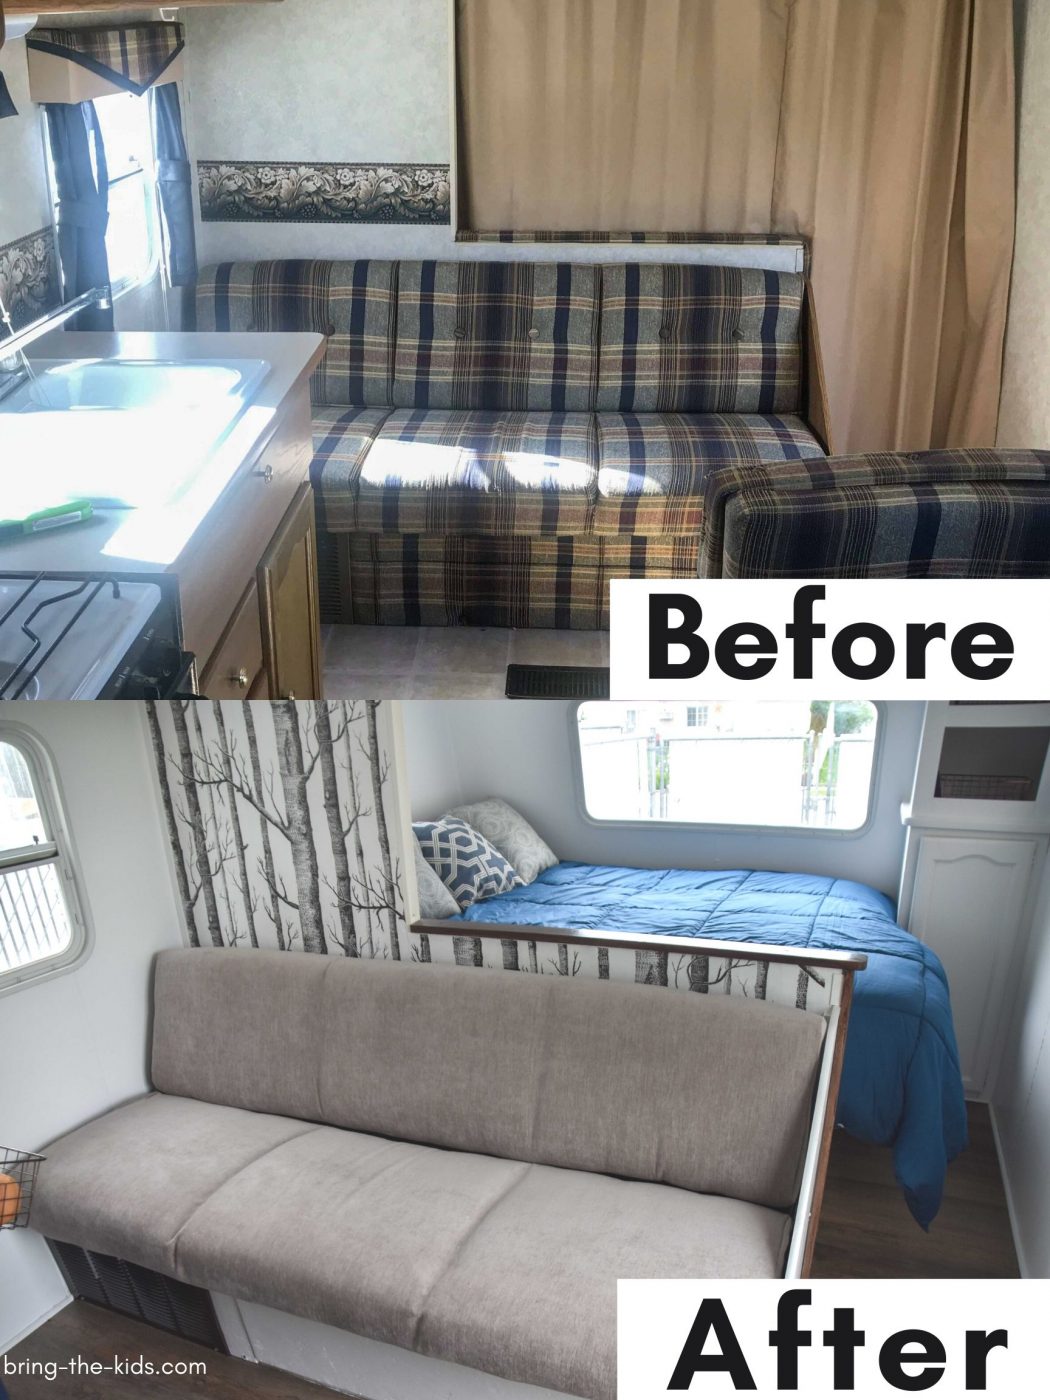
Recovering the cushions and couch
When we got our trailer, one of the first things that we agreed upon was that we were going to replace the cushions and sofa, or at the very least, we would recover them. On closer inspection, we learned that both the sofa in our RV and the dinette cushions were in really good shape, so we decided to recover them.
After reading countless articles where people had recovered their RV furniture with a paint drop cloth to save money, I decided to go that route.
As it turns out, making furniture covers with a painters drop cloth is a HORRIBLE IDEA!
After washing our drop cloth, and starting to sew with it, I instantly knew that it wouldn’t last. The fabric frayed too easily, the weave was too loose to hold up to the abuse that the furniture would get, and the overall quality of the material was incredibly poor. I quickly cursed all the bad advice to recover my RV furniture in a paint drop cloth, and went for some high quality upholstery fabric.

A quick visit to our local Joann Fabric Store and I found the perfect solution. I got a thick upholstery material that feels like a cross between velveteen and chenille. It’s super soft, cleans incredibly easy, is super thick and high quality, was a dream to sew with, AND it was crazy cheap. I paid $4/yard for the fabric and since it was 54” wide, I only needed 6.5 yards (check out the budget Upholstery fabric section and make sure to sign up for their coupons on the app).
The cost of high quality upholstery fabric (bought on a budget) is really not much more than a painters drop cloth, so take my advice and get good fabric to start with. Tip: To save money on your fabric costs, a big store like JoAnn’s is your best option. With their app they have amazing coupons and I got my material for 55% off which is what made it so affordable (not sponsored in any way).
Total Cost: 2 Dropcloths at $9 each (which I couldn’t use since they were junk), 6.5 yards of fabric at $4/yard = $43
Note: To simplify things, when our kids sleep on the sofa or dinette, we just have them sleep in their kids sleeping bags.
Covering The RV Countertop
Ready for an easy project with some serious WOW? You’ll love our RV countertop remodel. I shared our covered RV countertops over on Instagram and my inbox blew up with messages from people asking what we used to make them look so good.
You won’t be surprised at this point, but we used a water resistant peel and stick contact paper. Yes, our countertops are contact paper.
After reading review after review of people who used this contact paper in their home kitchens, I knew that it could withstand our RV kitchens needs.
I recovered our kitchen and bathroom countertops, our dinette table, and the top of our nightstand with only 2 rolls of contact paper.

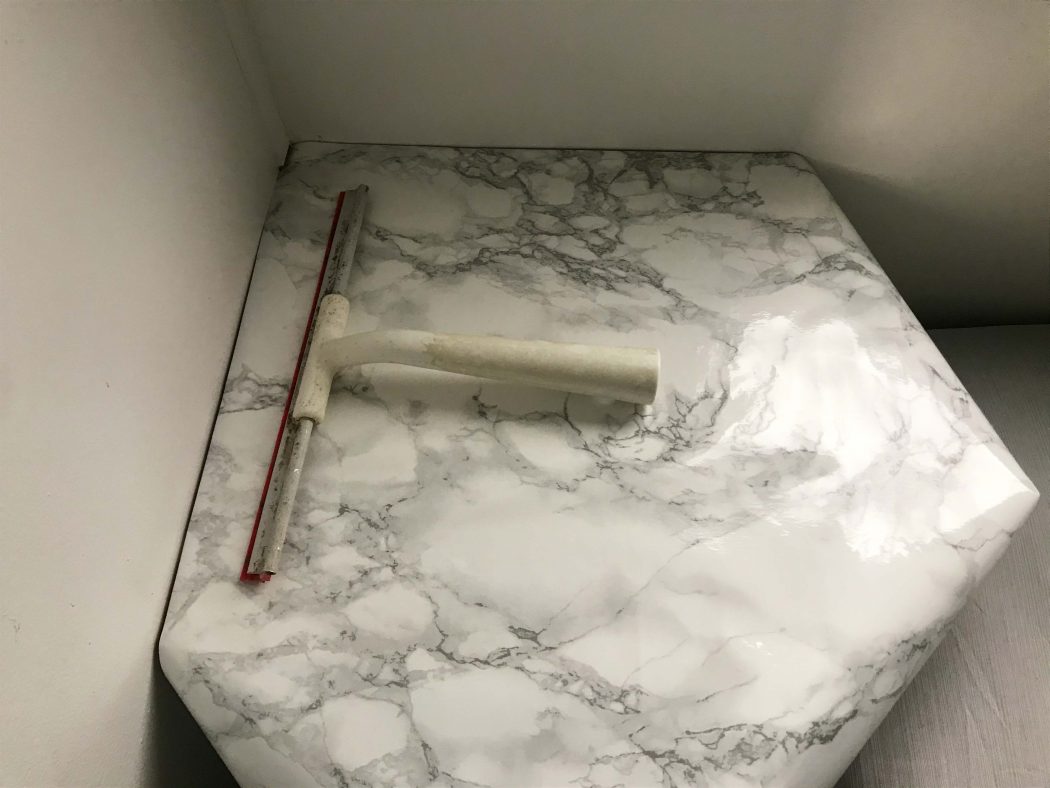
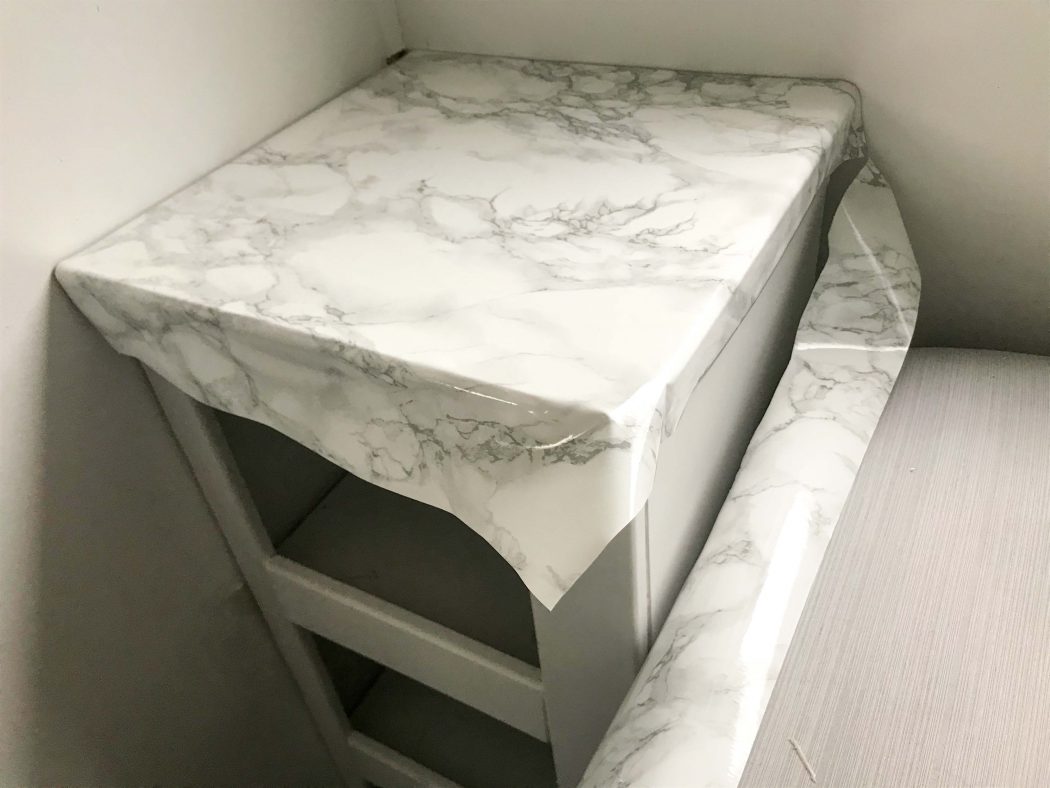
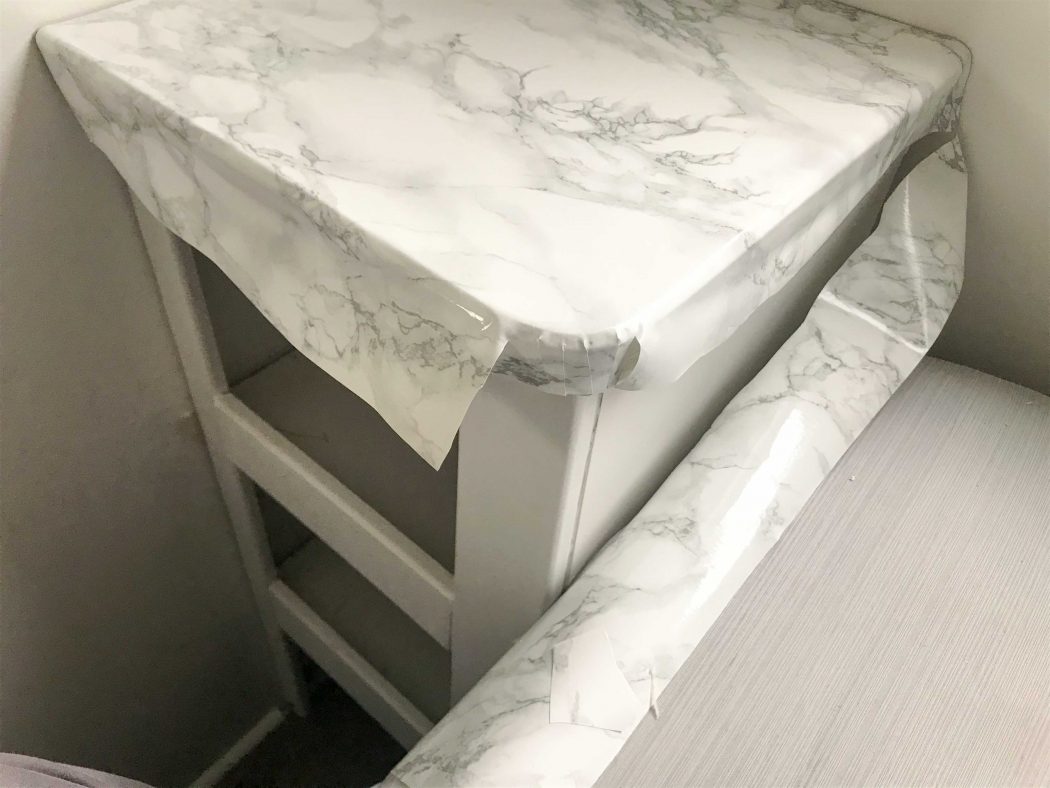

Tips for installing contact paper on your RV countertops: spray the countertop lightly with Windex before you start, which will allow the contact paper to move around while you’re getting everything adjusted. When you have the placement just right, use a squeegee to push out all the extra liquid so the adhesive will stick. Also, for rounded edges, use a razor cutter to make slits in the contact paper so that it can go smoothly around edges (start in an inconspicuous place so you can practice before you get to the main areas – I did the opposite order and completely regret it). Another trick you can use is to briefly heat up the contact paper with a hair dryer, which allows it to stretch over difficult areas.
Product we used:
Grey Marble Contact Paper
Total Cost: 2 rolls of contact paper at $10 each = $20
Changing RV Mattresses For Regular Mattresses
RV mattresses are absolutely horrible, and while I’m okay if the kids sleep on a less than stellar mattress, it just isn’t going to work for me. Most RV’s use a short queen mattress in the master bedroom, but we wanted to replace a short RV mattress, with a regular sized mattress. You see, I’m 5’10” and my husband is 6’2″ so a short mattress is a horrible fit for us.

Since we were trying to stick to a budget, we decided to try and use an old queen mattress that we already had. To do that, we had to notch it for the cabinet to fit, which took a couple hours, but we love the result, and our backs are especially grateful to have a good mattress.
Total Cost: New wire cutters to cut the box springs = $12
Organizing the RV
One of my biggest goals when designing our R-V remodel was to do everything possible to eliminate clutter. That made good RV organization strategies a top priority.
When we’re out camping it seems that our biggest clutter producers are shoes, coats, and hats.
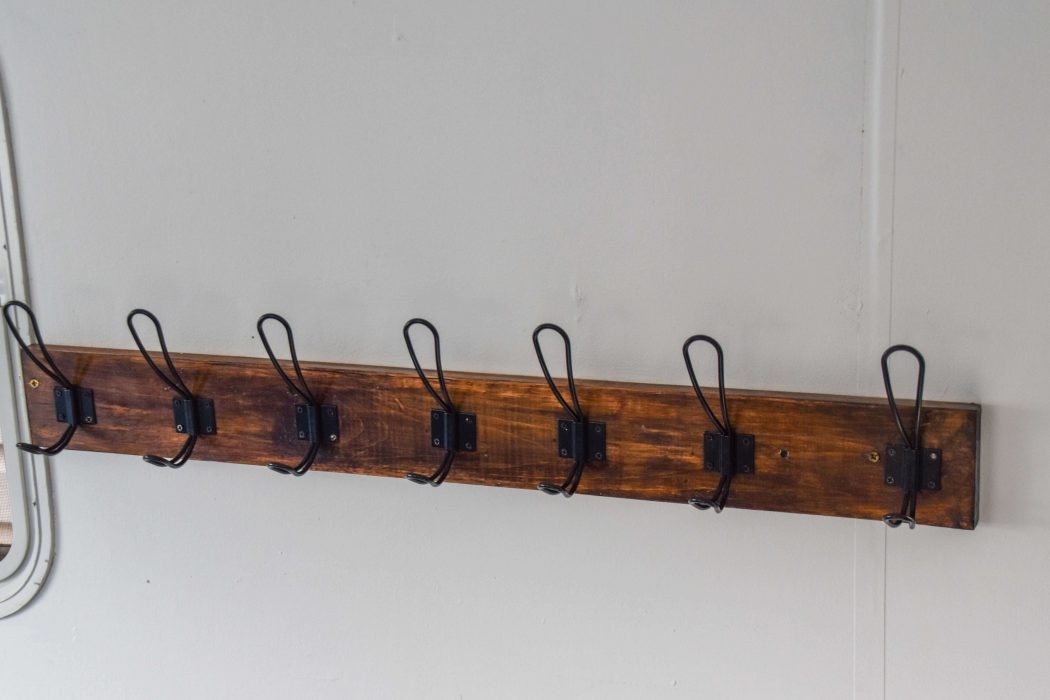
The other major clutter buster was to install hooks in both our living area, and in our bathroom. I found these super cute hooks which are really amazing because they are big enough to hold several articles of clothes/towels at the same time. In the living area, we have 7 hooks, so every member of the family gets their own designated hook to help prevent losing things.
In the bathroom, I just installed 4 hooks, but since they are so big, they can easily accommodate 7 towels or lots of wet swimwear. Another way we cut down on clutter in the bathroom is to use microfiber towels, which are crazy absorbent, but also really small and compact. We have 7 microfiber towels that have gone on basically every adventure with us for years, and we think they’re amazing.

Most people think that you can’t screw anything into the walls of an RV, but that’s really not true. There are small studs in the walls of an RV, but they are not as regular or big as the wall studs in a home. In ours, we could easily locate studs, by pushing on the walls.
Since we knew that we wanted our hooks mounted securely to the studs, we first located our studs, and then made our hook racks to fit in that size so that they would be secure.
Shoe organization in an RV is also a tricky challenge, and while it’s not pretty, we grabbed a plastic file crate for everyone’s shoes like this one. The idea is that it will stay outside during the day for kids to toss their shoes in and then we can easily bring it inside at night.
Products we used:
Large black hooks
Plastic File Crate (ours is similar)
Total Cost: Black coat hooks, 12 pack for $12, plastic file crate $6 = $18
Extra Storage in an RV
Storage and shelving space are always a hot commodity in an RV< so finding ways to create extra storage in your RV is a great idea. While our RV looks nice and spacious when it’s empty, when our entire family of 7 is inside, it suddenly feels like a really tight fit.
We knew that before we bought it, so we planned to add storage wherever possible to keep things organized in our small space. This RV Organization Guide was a LIFESAVER!
One of the first things we did was to remove the small drawers under the cabinet by the bunk bed. We found a huge empty space there and were able to convert 2 small shelves into an area with 2 giant shelves for a couple of our kids. On each shelf each kid has a fabric cube from the dollar store to keep all their things inside. UPDATE: The fabric Dollar STore CUbes were CRAP, so we replaced them with these affordable fabric cubes and they’ve done great for the last 2 years!
Between our 2 new shelves that we created and the 3 already in the cupboard above, each of our kids now has their own shelf, which is plenty of space for them in our renovated RV. Considering that when we went on our family gap year, our oldest 4 kids shared 2 carryon suitcases for an entire YEAR (including school books and toys), this actually feels pretty spacious for RV storage.

I also added a shelf system in the master bedroom area above our cabinet where there was a bunch of dead space. I seriously love how good it all looks and how finished and organized it makes everything about RV life feel. To make all the shelving I used a combination of 1×3 mdf boards and a sheet of hardboard.
On our shelving, I added some amazing wire baskets that I’m completely in love with (and they were only $3.25 – SCORE!!). They’re from Walmart, but they’re crazy affordable and amazing quality.
They come in a rose gold color, but we spray painted ours with a dark brown spray paint to give them an oil rubbed bronze look that we absolutely love. We love these so much that we ended up using them all over the trailer and will probably even go back for more at some point. 3 years later these baskets are still holding up SO WELL in our remodeled RV!

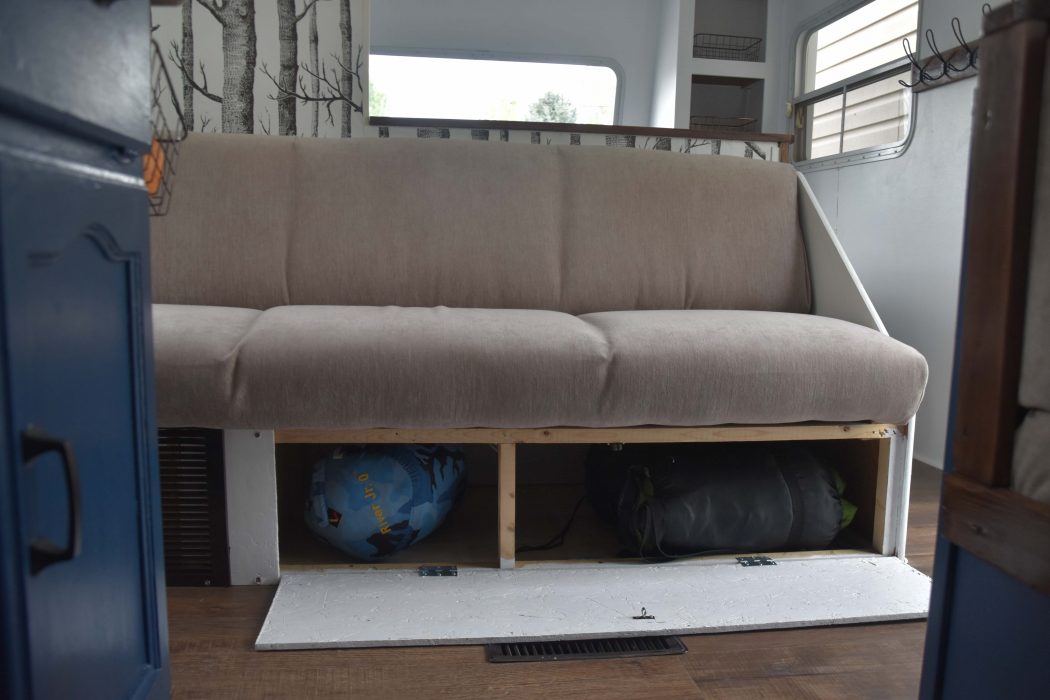
We also reclaimed some great storage space under our jackknife sofa by changing how we access that space. If you’ve ever tried to store something under an RV couch, you know just how hard it can be to get items in and out while precariously balancing the sofa in the half open position.
To fix that, we removed the panel on the front of the sofa, and reattached it with a hinge and a clasp. Now the kids can easily store their bedding there and access things quickly even when the sofa is open.

Products we used:
Wire Baskets
Total Cost: Wire baskets 6 at $3.25 each, hardboard $15, 5 MDF boards at $3 each, 2 hinges and 1 clasp $3.50 = $52
Wood Trim Pieces
Another expense that we had on our RV renovation was to redo the trim around the trailer. The original trim was all chipboard covered in plaid fabric so it quickly made it’s way into the garbage can. We replaced the trim with stained pieces of wood around the trailer. It was the project that really completed the whole look of the trailer and added some stability to some areas of the trailer.

We also used the wood trim pieces to mount all of our large black hooks so that they had something solid to screw into (and then we screwed those boards into the frame). We used Minwax Polyshades in Antique Walnut, which is great because the polyurethane is part of the stain so it’s just one quick step.
Products we used:
Minwax Polyshades Antique Walnut
Total Cost: 5 1×3 boards at $4 each, 3 1×4 boards at $5.50 each, Polyshades Stain $10 = $45.50
Total R-V Remodel Costs
So the question that you really want to know the answer to is how much does it cost to remodel an RV? Obviously, there are a ton of factors in play, but we really did what felt like a completely overhaul on our camper renovation. Luckily we had good “bones” to our trailer and were able to reuse things like the cabinets, sinks, toilet, and cushions, so we didn’t have to replace any of those on our RV renovation.
In total, our RV costs here show we spent $584.44, so all of this cost us less than $600.
We did spend a bit more money than this outfitting our RV including about $125 on kitchen supplies, and $100 on new sheets, bedding and a shower curtain. We also spent about $15 on crates and bins for organization in our drawers and cupboards, and $15 on trash cans. When you add that all in, we still spend under $850 on our entire travel trailer renovation, which completely blows my mind!
What Skills Do I Need To Renovate A Camper?
Wondering if you can figure out how to renovate a camper or RV? I’ve done a few home improvement projects over the years, but most of the work to figure out how to renovate a camper was figured out with my two favorite resources, Google, and YouTube.
As my daughter said on our first camping trip “I love this trailer even MORE than a new trailer, because I MADE IT!” That was our goal all along, and it’s become perfect for our family right now!
We all absolutley loved the process of camper renovation and if we decide to get another budget travel trailer in the future, we’ll absolutely be doing another budget camper remodel on that trailer as well.
RV renovations can be simple or complex. We were able to completely redo the interior of our RV in just one week, with only myself and my 5 young kids working on it. Our RV renovation included painting everything, new flooring, Shower renovation, new upholstery, and new wallpaper.
We used Glidden paint for our RV cabinets and it’s holding up wonderfully. More importantly, RV cabinets need to be sanded, cleaned and primed so that paint will adhere properly. After a year, we are so happy that we used this budget pain on our DIY travel trailer remodel.
If well taken care of, and protected from water damage, an RV travel trailer will last decades. My in-laws bought a travel trailer when my husband was an infant and it’s still in good working order and regularly used, so it’s almost 40 years old.
The best thing you can do to make a travel trailer last longer is to protect it from the elements when not in use. The best way to do this is by covering it with a tarp or RV cover when not in use, to prevent extra weathering and potential damage.
The easiest way to update RV walls on a budget is with peel and stick wallpaper. This is easy to install and also easy to remove if you change your mind in the future. Paint is the next best option, thought does take more time and prep work than peel and stick wallpaper.
To paint the entire interior of our 26 foot travel trailer, we used 3.5 gallons of paint. We painted nearly everything from the walls, to the beds, and of course all the cabinetry.
Unless you’re dealing with major damage or problems, most people can renovate a camper all on their own. Camping and RV stores cater specifically to DIY solutions, so don’t be afraid to go in there and ask some questions!
We did our budget camper remodel for just under $600, and $850 including everything we put in the trailer such as bedding and dishes. If you’re willing to stick to a budget travel trailer remodel plan, I think you can absolutely do it for under $1000.
Absolutely! there are so many ways to change the look of an RV without painting anything. One of the best products is peel and stick wallpaper. It works great in an RV and it is really easy to apply. We used it on our walls and similar products to recover our RV table and countertops.
The best way to update an RV exterior is with a really thorough cleaning. If your RV has old decals on it, you can get a decal eraser that works great on an RV and can give your camper exterior an updated look in just a couple of hours. Just be careful not to let it rub in one spot for too long or it will remove the paint.
Absolutely! Camper vans and RVs are incredibly similar so a camper van renovation will be very similar to the things done in RV renovations. Just like your RV remodeling, come up with camper van remodel plans before you get started on any work!
Yes, it’s possible to change your RV lights for LED lights, and it’s a great idea. LED lights use less power in your RV, and don’t heat up the way that traditional RV lighting does. Here are some great LED lights that are very affordable if you want to change RV lighting.


We just bought a 2012 jay or jay flight and I have started renovating it. Was going to use drop cloth and already bought the Epoxy. Thanks for your post as this will save me! Hope you enjoy your travels what a great experience for your children!
Good luck on it. That epoxy spray is crazy strong so make sure to cover all your skin and hair so you don’t have to scour your skin like I did!
I am just amazed at the difference! Your kids are hard workers and adorable!
It was so rewarding for all of us to work on it together and to see the transformation in the photos. My youngest actually doesn’t believe that the before pictures were from our trailer, even though he’s in the photos 🙂 But then again, he is just 3!!
Good to know about the drop cloths. You could always use the drop clothes for some curtains in the future.
Great idea! I’m keeping the extra around because I know I’ll have a project come up that it’s just perfect for!
Wow, your remodel looks amazing! We have a 2002 camper with the exact floor plan so I was so excited when I found your post. I want to build extra storage above the cabinet by the master bedroom like you did. How did you attach it to the walls? Curious about the details if you used brad nails or found studs? Thank you for any help you can offer me!
We framed the extra storage in the master area out primarily relying on attaching it to the cabinets above and below. The sides are just thin wood that is brad nailed on and the shelves attach directly to the frame, so they are nice and solid. Both sets of cabinets that we attached the storage to were really sturdy, so I think this will be a good long term option.
I love the backsplash you did for the kitchen area. How did you finish the edges at the wall? I am about to do this very thing to my 2006 Crossroads Cruiser 5th Wheel caravan, so I would be interested to know.
Cheers Lynda C from DownUnder
Lynda – There was already a bit of a trim piece at the edge of the wall by the refrigerator, so we just left that there and did the backsplash tiles right up to it. The other end of the backsplash by the sink, we just cut and left it as it. The backsplash “tiles” are really more like thick puffy stickers, so you really don’t need to do any finishing.
This is so helpful. So amazed you were able to get this done so quickly and so cheap! Can I hire you to come do mine I’m slow and not handy but gonna give it a go! Thanks for all your help!
This is so inspiring! We just bought an RV for our family of 7 as well! It’s a little larger (37’) but I’d REALLY love to fix it up before we live in it! I thought I’d have to have my hubby do everything but maybe I’ll tackle some myself with the kids!! You all did an amazing job! Thank you so much for all the info and the inspiration! ❤️
You can totally do it!!
Thank you so much for your detailed descriptions and prices on your remodel. It looks great and I hope your family makes wonderful memories in this little gem!
I want to Congratulate you and your family for all of the info, pictures, instructions and hard work to make something so great for years to come. Your children will remember this experience for the rest of their lives.
It’s been such a fun process together!
Did your countertops have the rubber edging? If so did you go over it with contact paper or remove it?
We just went over the edge with the contact paper. I started removing a small section of it initially, but the material under the rubber edging was too rough for the contact paper to stay smooth, so I left it on.
Love the reno , and a week?! That’s crazy! Way to go! Curious about the contact paper on the counters. How has it held up? We have 4 kids and I can imagine them getting ripped up! Did you put a covering coat? Also, your sink in the kitchen looks different, did you paint that? Thanks so much!
Meghan- I really wanted to see how it lasted through the winter, and it did so much better than I had anticipated. The counters are holding up just as well a year later as they did from the beginning. We are careful to use cutting boards with our knives, but we’ve honestly had no problems. No rips, no stains, no bubbling in our contact paper counter tops. I think that the type of contact paper you buy has a big impact on it, so check out the one I linked above!
Thank you for the inspiration fixing to get started on our soon. Wish i could see the layout of yours cause ours is gutted and looking for a way to set it for a family of 3 2 adults and a toddler
Honestly, for just three people, I think that any layout can work. We have 5 kids in our family, so 7 of us total, so we had less options for camper sleeping configurations.
Do the bunk beds have sleeping bags or different bedding? Your Reno is so awesome!! Do you have any tutorial tips for recovering the cushions? Thank you!!
I really need to put together the tutorial for recovering the cushions and the couch (there was a definite learning curve to this aspect of our cheap RV remodel). The beds all have sheets and a bedspread on them, but a couple of our kids sleep on the dinette and couch and they use sleeping bags.
I love your renovation and that your kids helped so much! One question I have is how did you attach or secure the wood trim on the dinette booths? I want to do this in my RV but am not sure how to go about it.
Thank you in advance!
Crystal
I just screwed it on.
Thank you so much for this blog post. We’re looking for a used RV at the moment and to stay in our price range, I fully expect to have to renovate the interior to convince my husband to come (he’s not a camper ;)). I renovated our pop up camper by myself because my husband was working a lot of overtime too and I expect to have to do so with an RV. I love that you got your kids involved! I might have to try this when we finally purchase ours.
There are really so many great products and options out there to renovate and RV for cheap. I hope that you love renovating your RV as much as we did!
Oh my gosh!!! What an amazing and thorough article. You answered questions before I could even ask them. You and your children did a phenomenal job on the reno. Thank you for including pictures/thorough description/brands of the products you used. I’m hoping to buy a smaller camper and reno to have a little “get-away” when the stress gets to be too much. Thank you for taking the time to help us future renovators! I love everything about your “new” camper.
Is this the trailer you are still traveling in? We have two more kids than you guys and just purchased a 2016 JayFeather. I’m trying to convince my husband into painting it but he thinks painting over laminate will just peel off in less than a year? How is yours holding up especially after living with kids in it? Anything you would do different?
I’m so inspired. We just put a downpayment on our first RV and we are going RVing full time in three months. I can’t wait to redo the RV we are buying and truly making it our own. You have inspired me and given me so many helpful tips for when I start me renovation. Thanks!